VOXL 2 Remote Controller Configurations
Table of contents
Summary
We are working to expand the capabilities of VOXL 2 every day. The built-in PX4 flight controller enables industry leading SWAP for an autonomous flight controller, but not every interface and flight controller are supported yet. This page provides an overview of available connectivity. If this connectivity is insufficient for your application, VOXL 2 is a world-class companion computer for autonomous navigation and AI when paired with an external flight controller.
Remote Controller Options for Built-in Flight Controller
| R/C | Protocol | Includes Telemetry | Instructions | Adapter | Example Hardware |
|---|---|---|---|---|---|
| Ghost Atto | UART / GHST | No | Not required | Ghost Atto | |
| Ghost Atto | SBUS | No | See Ghost Atto SBUS Protocol in this document | VOXL 2 I/O | Ghost Atto |
| ELRS | UART | Yes | MAVLink and CRSF raw | ||
| Spektrum (DSMX) | UART | No | Here | M0094 | SPM9745 |
| TBS Crossfire | UART | Yes | MAVLink and CRSF raw | ES900RX | |
| Graupner | SBUS / UART | No | Here | VOXL 2 I/O | Graupner GR-16 |
| FrSky | No | Not yet supported | |||
| Futaba | No | Not yet supported | |||
| WiFi | IP / Mavlink | No | VOXL 2 Wifi Dongle User Guide Connect QGC over WiFi | ||
| Microhard | IP / Mavlink | No | Microhard Add-on Manual | ||
| Doodle Labs | IP / Mavlink | No | Doodle Labs User Guide | ||
| Cellular | IP / Mavlink | No | 4G or 5G |
Spektrum (DSMX)
Hardware
Tested hardware:
- Spektrum SPM9X45
NOTE: recomendded to have binding method outside of VOXL 2.
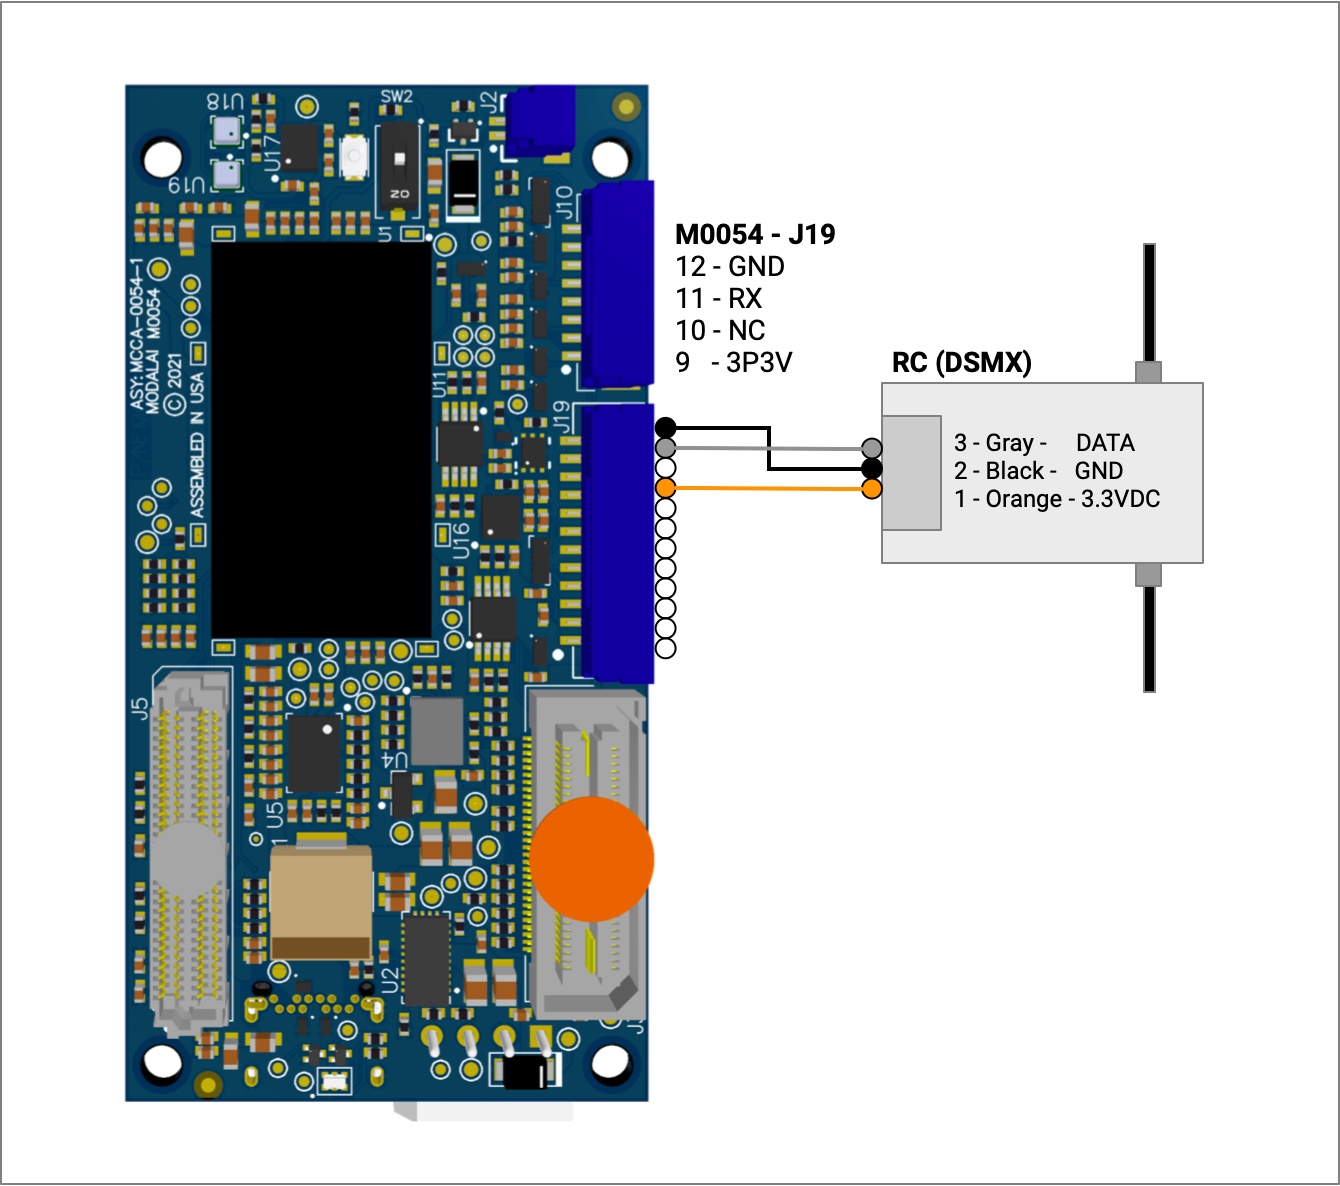
M0054 J19:
- Connector on board : SM12B-GHS-TB(LF)(SN)
- Mating connector : GHR-12V-S
Software
Checking Status
The px4-listener input_rc command can be used to check status.
CRSF
Hardware
PLEASE NOTE: the baud rates for the receivers likely need to be updated.
The baud rates for the receiver UART are set here when PX4 starts on VOXL 2:
- MAVLink - https://github.com/modalai/px4-firmware/blob/voxl-dev-1.12/boards/modalai/rb5-flight/voxl-px4.config#L172
- CRSF - https://github.com/modalai/px4-firmware/blob/voxl-dev-1.12/boards/modalai/rb5-flight/voxl-px4.config#L175
Tested hardware:
- Happymodel ES900EX (in CRSF mode)
- TBS Crossfire Nano Rx (in MAVLink mode)
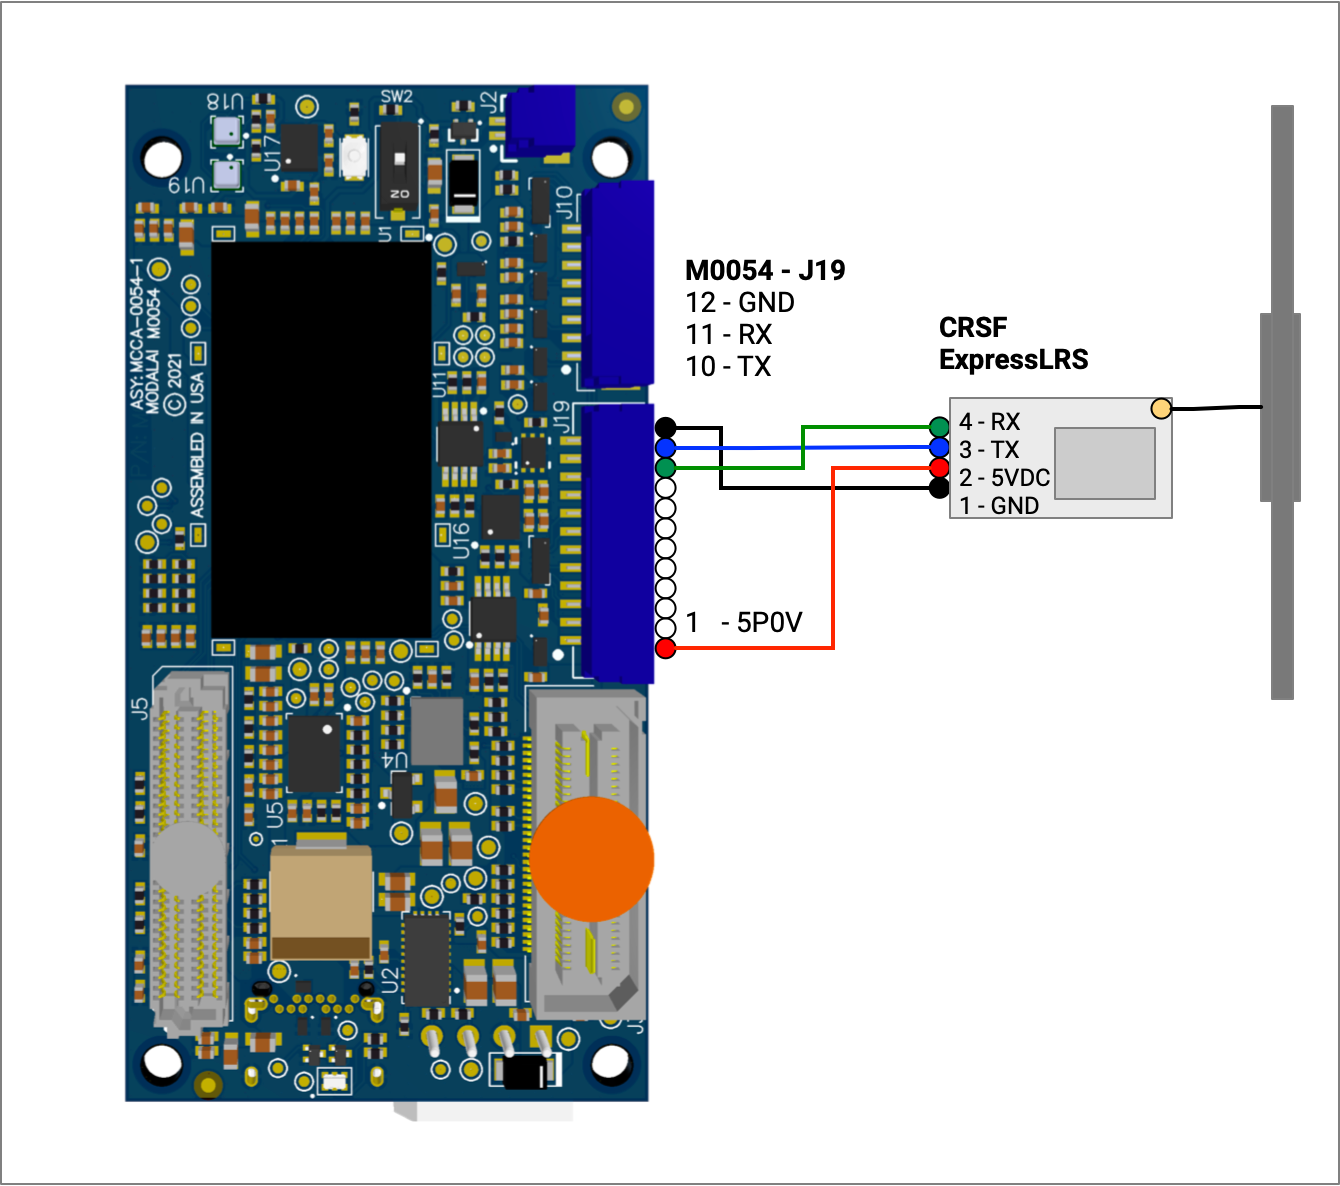
M0054 J19:
- Connector on board : SM12B-GHS-TB(LF)(SN)
- Mating connector : GHR-12V-S
Software
PLEASE NOTE: If using voxl-px4, edit “/etc/modalai/voxl-px4.conf” setting “RC=CRSF_RAW”
Checking Status
The px4-listener input_rc or px4-listener rc_channels command can be used to trouble shoot, if neither have been published it’s likely the receiver has yet to get RC data or the serial link isn’t working.
Ghost Atto RC
GHST Protocol
Connect the RC Receiver to J19
- TX on the GHOST receiver to RC_UART_RX on J19
- 5V on the GHOST receiver to VDC_5V_LOCAL on J19
- GND on the GHOST receiver to GND on J19
PLEASE NOTE: If using voxl-px4, edit “/etc/modalai/voxl-px4.conf” setting “RC=GHST”
SBUS Protocol
With the VOXL 2 wired up to the connect the VOXL 2 IO board with the Ghost Atto receiver attached to port J3:
- Power on the system, the Atto should have a solid blue LED indicating paring mode.
- Power on the RC controller with the Ghost TX attached.
- On the Ghost Module TX, click the nozzle in.
- on the main menu, Navigate to
Mode...and click in the nozzle. - Change the following:
TX ModefromAutotoManualProtocolfromGHSTtoSBus
- Move the nozzle to the left.
- Navigate to
Bind...then press in the nozzle. - Navigate to
Bind + Setupand changeRXtoProtoSBus. - Navigate to and Select
Start Bind
At this point the Atto should transition from a solid blue light to a red and yellow light indicating the binding was successful. If you go in to the Radio tab on QGC you should see the values for roll, pitch, and yaw. Change as you move the RC controller’s Thumbsticks.