VOXL2 PX4 HITL
Table of contents
- Introduction
- HITL
- Gazebo Setup
- Hardware requirements
- FTDI Cable Image
- Hardware setup
- Gazebo simulator setup on host computer:
- Software setup on VOXL2
- Running the simulation and PX4 in GPS mode
- Flying the drone with a radio control
- Running a mission from QGroundControl (QGC)
- Running a figure 8 via the microdds service and ROS2
- Running pre-made mission and testing success of mission
- Archived instructions
Introduction
Software in the loop (SITL) and Hardware in the loop (HITL) are great ways to test new features before going out and trying to fly with them on a real drone. Since the VOXL2 PX4 software architecture is quite a bit different than what you get with SITL it makes HITL a valuable tool.
HITL
The VOXL2 is connected to a host computer via a serial link. The host computer is running the simulation where simulated sensor readings are sent to PX4 and actuator responses (essentially, ESC commands) are sent back to the simulation.
Please refer to the official PX4 documentation for more details (https://docs.px4.io/v1.14/en/simulation/hitl.html)
Gazebo Setup
VOXL2 HITL supports the Gazebo simulator. Please be aware that gazebo naming is very confusing! In the past there was gazebo and gazebo ignition. Gazebo was the current version and gazebo ignition was new version. At some point they decided to change the name of gazebo ignition to gazebo and change gazebo to gazebo classic! PX4 1.14.x has this updated naming scheme. Unfortunately, the new gazebo does not support HITL yet so we have to use gazebo classic. On top of that, starting with Ubuntu 22.04, gazebo classic is no longer supported. So, to make things less confusing, we have incorporated everything you need into a Docker image so that you don’t have to mess with patching and building gazebo yourself. However, if you want to see how we did it you can find our forked version of gazebo here: https://github.com/modalai/PX4-SITL_gazebo-classic/tree/voxl-dev
The following requires a knowledge of how to run software in terminal/bash.
Hardware requirements
- FTDI Cable (USB to serial) connected to a 4-pin JST. Don’t connect the power line! Only ground, transmit, and receive.
- Recommended cable: https://www.sparkfun.com/usb-to-ttl-serial-cable.html (CAB-12977)
- Host computer that is capable of running gazebo (Ubuntu 18.04/20.04/22.04 or MacOS)
- Voxl2
- RC transmitter and receiver if you want to fly with that. This is optional.
- WiFi or other network connectivity if you want to connect with QGC. This is optional.
FTDI Cable Image

Hardware setup
- Connect the FTDI USB side to your host computer and the JST connector to the VOXL2 J18 port (https://docs.modalai.com/voxl2-connectors/#j18-uart-esc).
Gazebo simulator setup on host computer:
This assumes that you already have Docker installed on your host computer. It will pull the compressed image from our public server and load it, tag it.
wget https://storage.googleapis.com/modalai_public/modal_dockers/voxl-gazebo-docker_v1_2.tgzdocker load < voxl-gazebo-docker_v1_2.tgzdocker tag voxl-gazebo-docker:v1.2 voxl-gazebo-docker:latest
To verify that it was loaded properly use docker images and make sure that voxl-gazebo-docker is listed.
Software setup on VOXL2
HITL support in PX4 was not introduced until after the SDK 1.0.0 release. It is recommended to get the latest SDK for the most up to date version. At a minimum you should be running SDK 1.1.2 or better.
Running the simulation and PX4 in GPS mode
On host computer
If the user wishes to use QGC with gazebo - this must be opened AFTER gazebo has been started.
This is the standard way to launch Gazebo and will bring up the GUI:
xhost +docker run --rm -it --net=host --privileged -e DISPLAY=$DISPLAY -v /dev/input:/dev/input:rw -v /tmp/.X11-unix:/tmp/.X11-unix:ro voxl-gazebo-docker ./run_gazebo.bash
This can be used to launch Gazebo without the GUI (AKA headless mode):
docker run --rm -it --net=host --privileged -v /dev/input:/dev/input:rw voxl-gazebo-docker ./run_headless.bash
On Voxl2
The following commands are done on the voxl2 shell via adb or ssh.
You must disable auto start of PX4. Use
systemctl disable voxl-px4to disable auto starting of PX4. Then usesyncto make sure the changes are saved. Then reboot. Once rebooted you can usevoxl-inspect-servicesto verify that voxl-px4 is not enabled or running.
Ensure that
voxl-qvio-serveris disabled. If it is enabled, it will confuse gazebo due to gazebo sending fake sensor data to the qvio algorithm and causing poor flight dynamics in HITL. This can be done with thesystemctl disable voxl-qvio-servercommand.
In a terminal instance, run:
voxl-px4-hitl
This will start px4 to run in HITL mode and as long as the ftdi cable connection is connected to J8 on the voxl2 mavlink packets will be transferred between the gazebo simulator and PX4.
To verify that HITL is working properly you can query the status of the HITL driver with the command qshell dsp_hitl status. You should see output like the following:
pxh> qshell dsp_hitl status
INFO  [qshell] Send cmd: 'dsp_hitl status'
INFO  [muorb] SLPI: Marking DeviceNode(qshell_req) as advertised in process_remote_topic
INFO  [muorb] SLPI: qshell gotten: dsp_hitl status
INFO  [muorb] SLPI:   arg0 = 'dsp_hitl'

INFO  [muorb] SLPI:   arg1 = 'status'

INFO  [muorb] SLPI: Running: yes
INFO  [muorb] SLPI: Status of IMU_Data counter: 1773
INFO  [muorb] SLPI: Value of current accel x, y, z data: -0.256672, 0.150797, -9.858628
INFO  [muorb] SLPI: Value of current gyro x, y, z data: -0.006096, -0.000621, 0.000415
INFO  [muorb] SLPI: Value of HIL_Sensor counter: 1765
INFO  [muorb] SLPI: Value of Heartbeat counter: 8
INFO  [muorb] SLPI: Value of Vision data counter: 0
INFO  [muorb] SLPI: Value of GPS Data counter: 44
INFO  [muorb] SLPI: Ok executing command: dsp_hitl status
INFO  [qshell] qshell return value timestamp: 38659532, local time: 38667163
You should see the IMU_Data, HIL_Sensor, Heartbeat, and GPS Data counters increasing each time you run the command. To run a simple flight to test operation use the following commands:
qshell commander armqshell commander takeoffqshell commander land
Flying the drone with a radio control
To use an actual RC transmitter to fly the drone in HITL it is necessary to enable the required RC driver in PX4 and change a parameter to indicate that you want to use the RC. For example, on Starling the command to start the RC driver is qshell crsf_rc start -d 7. This command will be different depending on what type of RC unit you have installed. In addition to starting the RC driver it is necessary to change the parameter COM_RC_IN_MODE to 0. You also need to make sure that px4 is in the proper flight mode (For example position control or manual):
pxh> qshell commander mode posctl
pxh> param set COM_RC_IN_MODE 0
+ COM_RC_IN_MODE: curr: 1 -> new: 0
pxh> qshell crsf_rc start -d 7
Then arm the drone with qshell commander arm and fly the drone with the RC transmitter.
Running a mission from QGroundControl (QGC)
- Open QGC on the parent computer running the simulation.
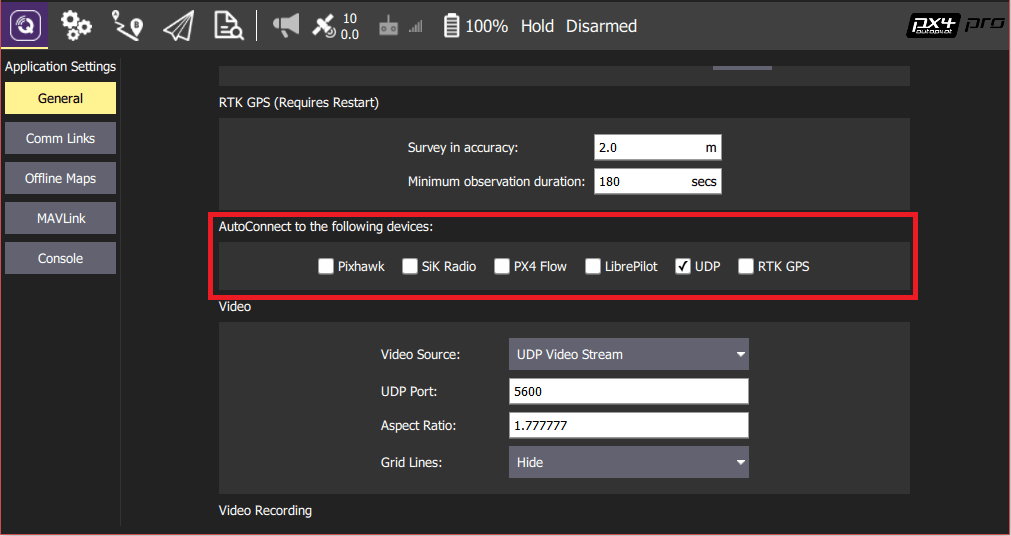
- Ensure that all AutoConnect options within the QGC settings are unchecked except for “UDP”.
- Restart QGC and upon these setting changes, the VOXL2 instance of PX4 will auto connect to QGC - Note: QGC will ALWAYS need to be opened after gazebo - this is so there are no port conflicts.
- Once connected, proceed to the top left corner of QGC, and select the Plan option within the Fly icon.
- The user can now input a mission with an initial takeoff point, waypoints, and other options. Once satisfied with the mission, proceed to select upload option. This will push the mission to the VOXL2.
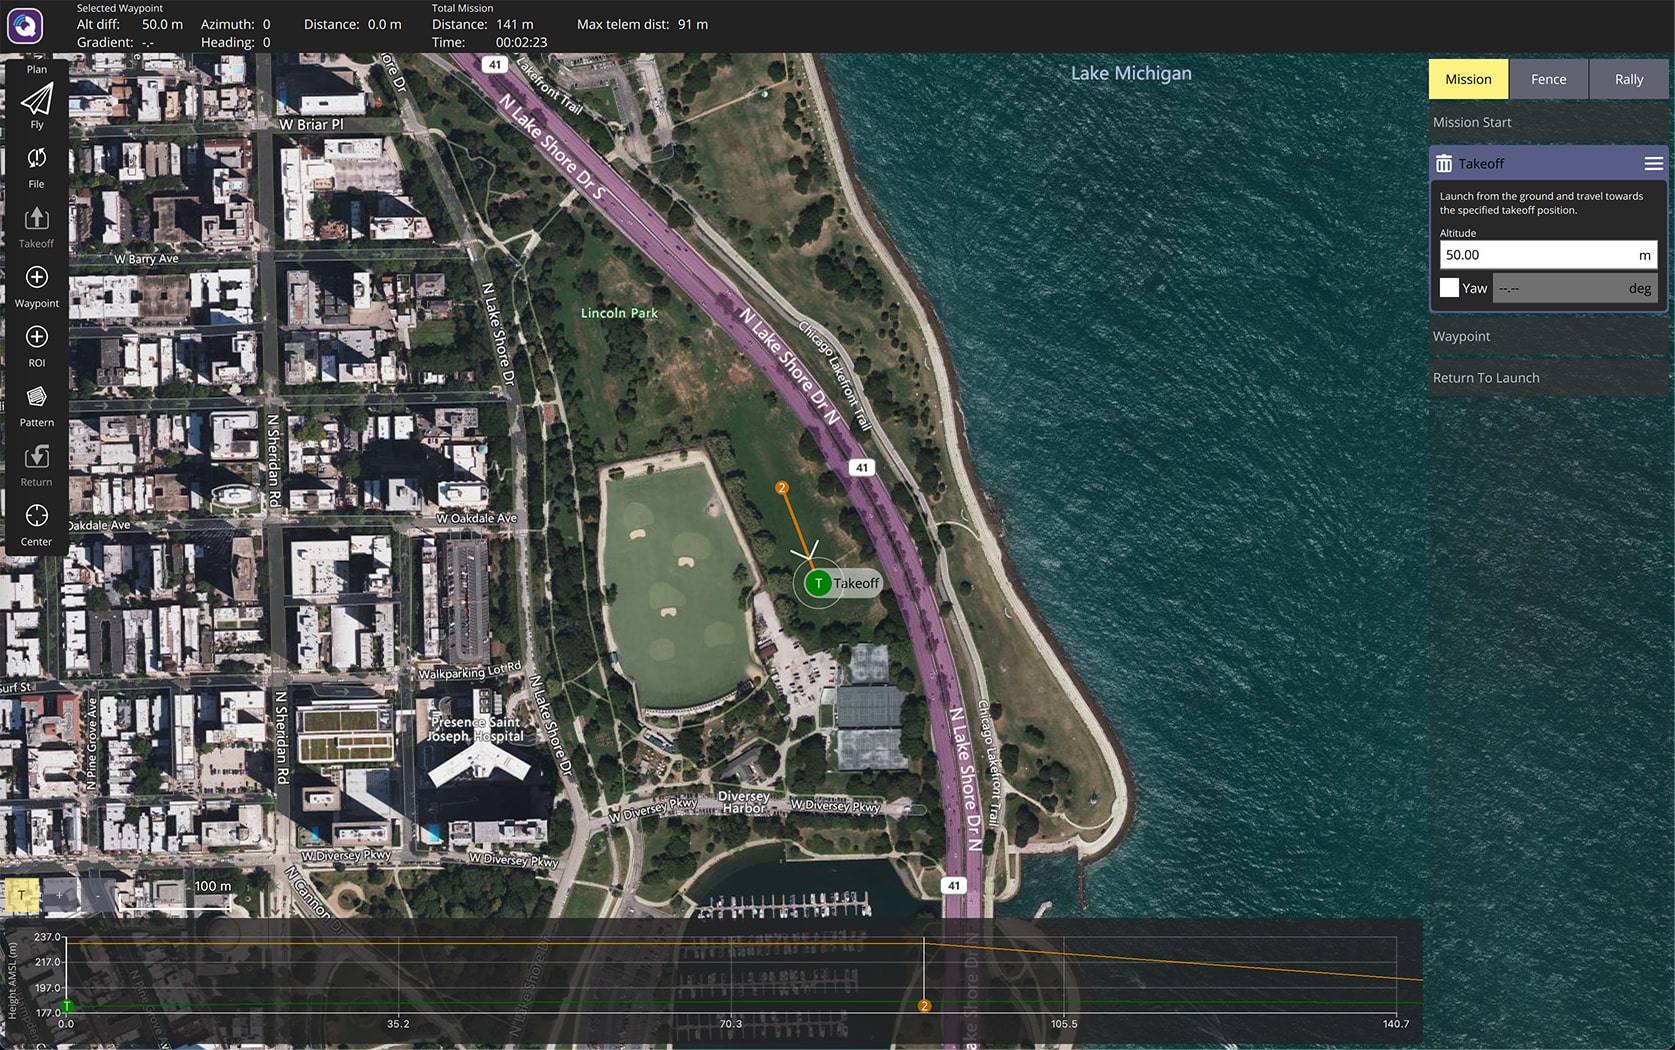
- Navigate back to the original screen by selecting the Fly option in the top left of QGC, under the Plan icon.
- Now that the mission has been uploaded, the user can select to takeoff and execute the mission by sliding the icon on the bottom of QGC to confirm/execute said mission.
- Sit back and enjoy watching the mission be executed in the gazebo.
Running a figure 8 via the microdds service and ROS2
- Ensure that the following three packages have been installed on target:
voxl-ros2-foxy,voxl-microdds-agent,voxl-mpa-to-ros2 - Once these have been installed - enable the microdds service via
voxl-configure-microdds-agent - Configure the mpa to ros2 pipeline with
voxl-configure-mpa-to-ros2\ - Finally, continue with running
voxl-px4-hitland the dockerized gazebo environment. On another terminal window, you can now runros2 run voxl_offboard_figure8 voxl_offboard_figure8and the drone will then fly in a figure via the microdds connection!
Running pre-made mission and testing success of mission
In this example MAVSDK is running on the host computer and sending Mavlink messages to PX4 over the network interface. MAVSDK can also be run locally on VOXL2. Information about how to run MAVSDK applications directly on VOXL2 are located here
- Ensure earlier steps were followed and that HITL is actively running in gazebo on host computer (in headless or GUI mode) and that
voxl-px4-hitlis running on voxl2 - Clone the following repository to parent computer running gazebo:
https://gitlab.com/voxl-public/flight-core-px4/voxl-px4-test - Plug parent computer into voxl2 on usb-c port
- Run the mission run script via:
./upload_mission.pywhich will upload and execute a predetermined mission - Once done, proceed to run the glean tester via:
./glean_tester.py - If a successful mission was done, the glean_tester will print out a success message, otherwise it will print an assert failure
Archived instructions
For those who were more comfortable with the original instructions they have been copied below for reference. However, It is not recommended to use these instructions.
Gazebo Setup
The following requires a knowledge of how to run software in terminal/bash.
Hardware requirements
- FTDI Cable (USB to serial) connected to a 4-pin JST.
- Host computer that is capable of running gazebo (Ubuntu or MacOS)
- Voxl2
FTDI Cable Image
Hardware setup
- Connect the FTDI USB side to your host computer and the JST connector to the VOXL2 J18 port (https://docs.modalai.com/voxl2-connectors/#j18-uart-esc).
- Open terminal window on parent computer and enter the following:
echo 1 | sudo tee /sys/bus/usb-serial/devices/ttyUSB0/latency_timer- This will decrease the default latency associated with FTDI cables in order to meet the timing requirements of the simulation.
This setting will revert back to it’s default when the host computer is restarted so this step will need to be completed after each restart. If wanted, place this in the ~/.bashrc or ~/.zsh file.
Gazebo simulator setup on host computer:
In order to get gazebo running on the host machine, run the following:
git clone https://github.com/PX4/PX4-Autopilot --recursivecd PX4-Autopilot./Tools/setup/ubuntu.sh- Using vim or nano, open the
PX4-Autopilot/Tools/simulation/gazebo-classic/sitl_gazebo-classic/models/iris_hitl/iris_hitl.sdfand edit theserialDeviceto/dev/ttyUSB0and save the file. DONT_RUN=1 make px4_sitl_default gazebosource Tools/simulation/gazebo-classic/setup_gazebo.bash $(pwd) $(pwd)/build/px4_sitl_default
This is to run GPS Iris model - if you wish to run VIO - swap the
iris_hitlmodel in thehitl_irisworld, with theiris_visionmodel.
Software setup on VOXL2
If you are using a Voxl2 running the most recent build of PX4, the following steps do NOT need to be done.
https://gitlab.com/voxl-public/voxl-sdk/services/voxl-px4- Follow the instructions in the repository README above on gitlab to build px4 on a linux distro and push/download on a voxl2
Running the simulation and PX4 in GPS/VIO mode
On host computer
If the user wishes to use QGC with gazebo - this must be opened AFTER gazebo has been spun up.
- If the user wishes to use a specific GPS location, run the following in ones terminal (where XYZ represents the GPS coord): a.
export PX4_HOME_LAT=XYZ
b.export PX4_HOME_LON=XYZ
c.export PX4_HOME_ALT=XYZ gazebo Tools/simulation/gazebo-classic/sitl_gazebo-classic/worlds/hitl_iris.world
On Voxl2
The following commands are done on the voxl2 shell via adb or ssh.
In an terminal instance, run:
- voxl-px4-hitl
This will boot up px4 to run in HITL and as long as the ftdi cable connection is connected to J8 on the voxl2, mavlink packets are being sent to and from. If the user wishes to run some commands from px4-shell, you can run things such as:
- qshell commander arm
- qshell commander takeoff
- qshell commander disarm
- qshell commander mode posctl
Running a mission from QGroundControl (QGC)
- Open QGC on the parent computer running the simulation.
- Ensure that all AutoConnect options within the QGC settings are unchecked except for “UDP”.
- Restart QGC and upon these setting changes, the VOXL2 instance of PX4 will auto connect to QGC - Note: QGC will ALWAYS need to be opened after gazebo - this is so there are no port conflicts.
- Once connected, proceed to the top left corner of QGC, and select the Plan option within the Fly icon.
- The user can now input a mission with an initial takeoff point, waypoints, and other options. Once satisfied with the mission, proceed to select upload option. This will push the mission to the VOXL2.
- Navigate back to the original screen by selecting the Fly option in the top left of QGC, under the Plan icon.
- Now that the mission has been uploaded, the user can select to takeoff and execute the mission by sliding the icon on the bottom of QGC to confirm/execute said mission.
- Sit back and enjoy watching the mission be executed in the gazebo.