Calibrate Camera Focus
Table of contents
- Overview
- Command Line Options
- Camera Focus Calibration Process
- Recommended Calibration Pattern
- Other Tips
Overview
VOXL Focus Camera is a package in VOXL SDK for calibrating / adjusting focal distance of cameras connected to VOXL.
Use of this tool requires the ability to view the overlay image coming from this application running on VOXL. We recommend using the VOXL Web Portal to view the overlay images.
Command Line Options
| Short Option | Long Option | Effect |
|---|---|---|
-h | --help | Prints this help information |
-s | --size | Specify the number of corners for the calibrator to look for (default 5x6) |
-e | --exposure | Set manual exposure (ms). Must be used with -g (–gain) option |
-g | --gain | Set manual gain (100 = 1.0x). Must be used with -e (–exposure) option |
Sample command for calibrating Hires camera on Stinger
voxl2:/$ voxl-focus-camera hires_default_misp_color -s 7x5
voxl2:/$ voxl-focus-camera hires_default_misp_color -s 7x5 -e 16.0 -g 400
Camera Focus Calibration Process
To calibrate focus on a camera, such as the high resolution camera, you can simply run the command:
Suggested Procedure
- start
voxl-camera-serverif needed - start
voxl-focus-camerausing voxl2 command line (with optional args)- for example, -
voxl-focus-camera hires_default_misp_color -s 7x5
- for example, -
- open
voxl-portalin browser and select the focus overlay stream (misp_camera_focus_overlay)voxl-portalcan be accessed either via wifi / ethernet or via adb port forwarding
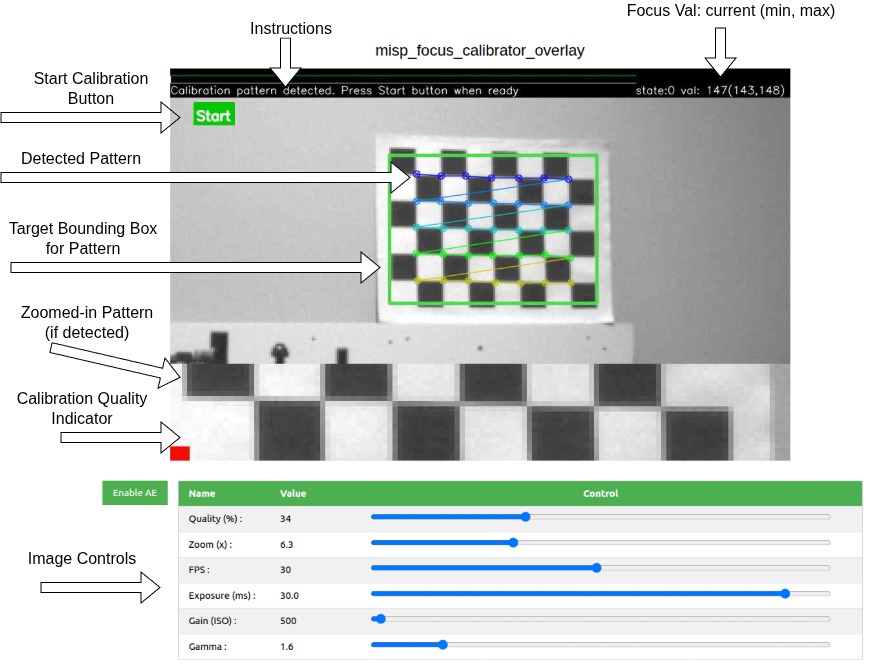
- position the calibration pattern in the frame. Once pattern is detected, it should be annotated with the green bounding box as well as small circles in each corner
- use drag and zoom (mouse) to center the pattern in the view, such that it fills 25-33% of the image (as shown in the sample screen shot)
- fix the pattern (and the camera) so that they do not move during the calibration process
- click
Startbutton inside the image and follow the instructions (found at the top of the overlay)- there will be several steps in the procedure, requiring the user to turn the camera lens back and forth in order to find maximum focus
- the calibration quality indicator (color bar on the left) will be tall and green color when focus is at maximum
- click
Resetbutton inside the image to restart the procedure, if needed - when you reach the step ‘Fine Tuning’ step, make the final adjustments while observing the quality bar and focus metric value (top right corner)
- end the procedure when satisfied with the results
- stop
voxl-focus-cameraapp usingcontrol-c
- stop
Sample GUI View
How the Camera Focus Application Works
- init
- subscribe to the provided camera stream
- lock AWB (Auto White Balance) by sending a command to the camera server via a control pipe
- set the image de-bayering mode to
nearestto avoid the smoothing artifacts in zoomed-in view (for color cameras)
- calibration
- lock exposure and gain to avoid brightness changes during calibration
- downscale and convert the incoming image to monochrome
- detect the calibration pattern
- exact the full resolution image ROI around the calibration pattern and compute the focus metric
- annotate and publish the image with calibration overlay
- keep track of calibration state
- cleanup
- set AWB to auto
- set AE to auto
- set de-bayer mode to auto
- Note: In order to reset the zoom to the original setting, restarting
voxl-camera-servermay be the best option after completing the focus calibrationsystemctl restart voxl-camera-server- alternatively, open the
voxl-portalto the standard camera view and set the zoom back to the original value (usually 1.0)
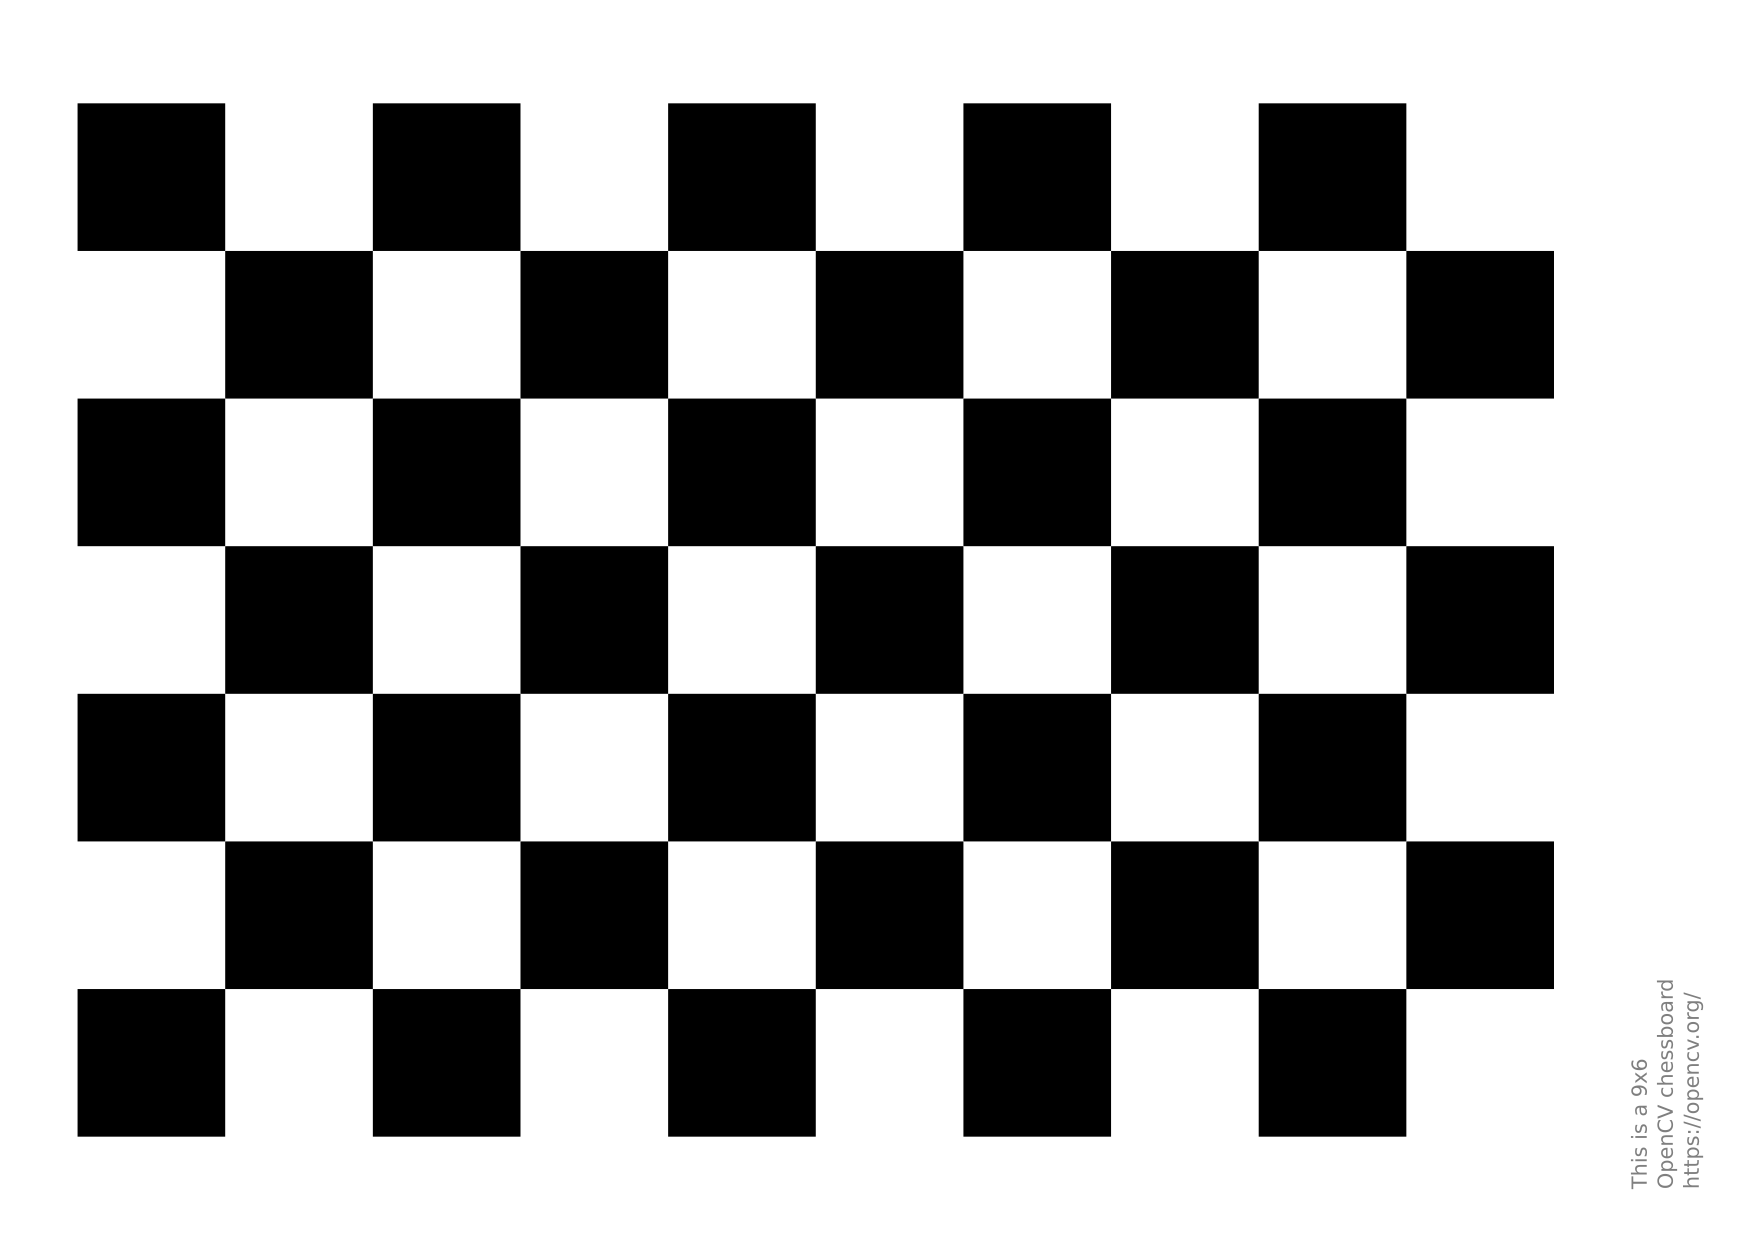
Recommended Calibration Pattern
A chessboard pattern is used for this calibration, however it is only used to detect how sharp the edges are. Nevertheless, the tool requires the user to input the correct size of the pattern (e.g. 7x5). Exact size of the squares in the pattern is not important.
The size of the chessboard is configurable using command line options. Recommended pattern size is 6x5 or 7x5 which are commonly used in camera calibration.
Here is an image for a 6x9: https://raw.githubusercontent.com/opencv/opencv/4.x/doc/pattern.png
Other Tips
- grey or color images are supported
- setting
voxl-set-cpu-mode perfis optional. it may reduce viewing latency - there is no need to maximize the misp output image size - a long as the raw image size is larger (preview_width, height), using zoom during calibration will allow to make use of higher resolution source image