Accessing QGC via ADB
Table of Contents
Enabling NCM on VOXL 2 for QGC over UDPThis doc assumes you have basic familiarity with setting up QGC
This change will require system image changes in the future, but for now we’ll just need to do a one time target side setup. The host side configuration should be done every time the target device is connected to the host machine (reboots, unplug-replug usb device, etc)
Requires SDK 1.6.3 or newer
Target Side Configuration (One time setup)
Make sure the device is booted and ADB is available. The following commands should be ran on target
Begin by configuring the usb gadget setup script that Qualcomm has already provided us. This command should be ran on target
sed -i '/ln -s functions\/ffs.adb configs\/c.1\/f2/a \ ln -s functions\/ncm.0 configs\/c.1\/f3 2>\/dev\/null | true' /sbin/usb/compositions/901D
Next setup a udev rule to give our NCM device a static IP (192.168.7.2)
echo 'ACTION=="add", SUBSYSTEM=="net", KERNEL=="usb0", RUN+="/bin/sh -c '"'"'sleep 2; /sbin/ifconfig usb0 192.168.7.2 netmask 255.255.255.0 up'"'"'"' > /etc/udev/rules.d/80-usb-ncm.rules
Finally reboot the device, if everything is setup correctly you should now see a usb0 network interface with the static ip we assigned
voxl2:/$ ifconfig usb0
usb0: flags=4163<UP,BROADCAST,RUNNING,MULTICAST>  mtu 1500
        inet 192.168.7.2  netmask 255.255.255.0  broadcast 192.168.7.255
        inet6 fe80::935f:1a09:ab1d:d2fb  prefixlen 64  scopeid 0x20<link>
        ether 56:77:2d:6c:84:9b  txqueuelen 1000  (Ethernet)
        RX packets 0  bytes 0 (0.0 B)
        RX errors 0  dropped 0  overruns 0  frame 0
        TX packets 0  bytes 0 (0.0 B)
        TX errors 0  dropped 0 overruns 0  carrier 0  collisions 0
Host Side Configuration
On the host side you should see a new usb0 network interface appear
❯ ifconfig usb0
usb0: flags=4098<BROADCAST,MULTICAST>  mtu 1500
        ether fa:74:5a:f3:2b:88  txqueuelen 1000  (Ethernet)
        RX packets 0  bytes 0 (0.0 B)
        RX errors 0  dropped 0  overruns 0  frame 0
        TX packets 0  bytes 0 (0.0 B)
        TX errors 0  dropped 0 overruns 0  carrier 0  collisions 0
Begin by bringing up the usb0 interface and setting a static IP for the host (192.168.7.1)
sudo ip addr add 192.168.7.1/24 dev usb0
sudo ip link set usb0 up
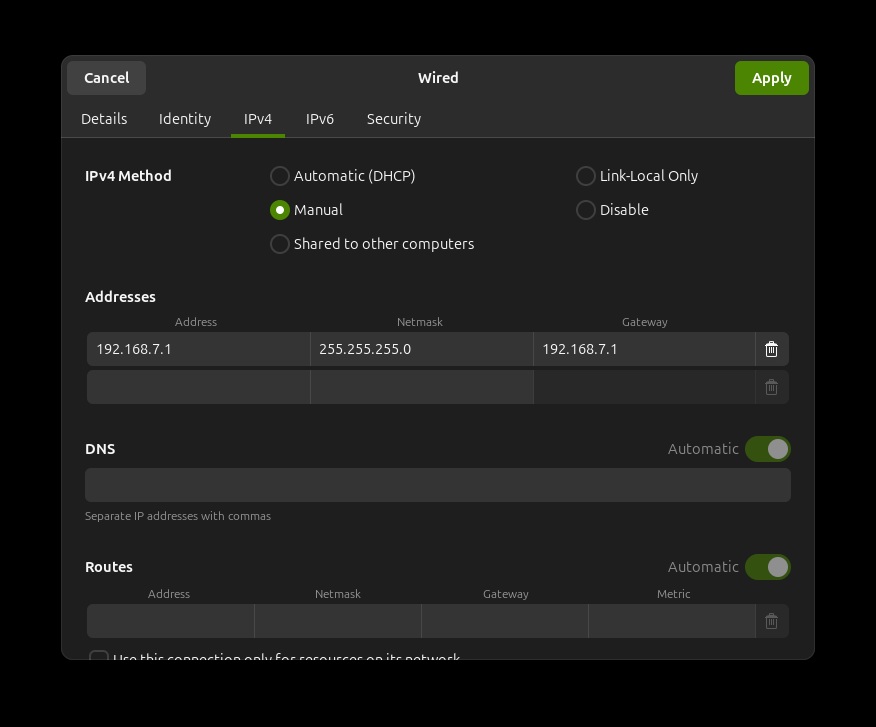
In order to make the above permanent set the following on the host machine:
You can validate that this worked by pinging the target side IP
❯ ping 192.168.7.2 -c 3
PING 192.168.7.2 (192.168.7.2) 56(84) bytes of data.
64 bytes from 192.168.7.2: icmp_seq=1 ttl=64 time=4.12 ms
64 bytes from 192.168.7.2: icmp_seq=2 ttl=64 time=3.90 ms
64 bytes from 192.168.7.2: icmp_seq=3 ttl=64 time=3.94 ms

--- 192.168.7.2 ping statistics ---
3 packets transmitted, 3 received, 0% packet loss, time 2002ms
rtt min/avg/max/mdev = 3.900/3.986/4.119/0.095 ms
Getting QGC Working
Finally load up QGC and setup a new comm link with the following settings
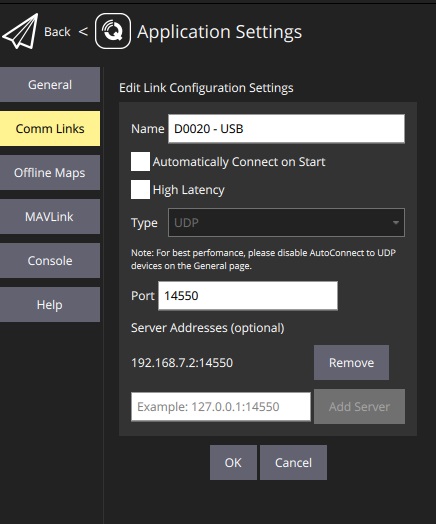
Save the config and connect to the device. You’re now ready to go!