VRX Ground Unit Developer Guide
Table of contents
- VOXL SDK Support
- Use Cases
VOXL SDK Support
SDK Versions
The VRX uses a different SDK than the drones at this time (5.4 kernel, Ubuntu20 rootfs):
| SDK Version | File Name | Link |
|---|---|---|
| VRX 1.5.0 | ubun2.0-multi_SDK_1.5.0.tar.gz | Downloads |
Note: this version won’t work on drones yet.
Use Cases
Video Streaming over RF
This is how systems are configured by default and use the integrated RF path to stream video.

Using Multiple VRX to View Single VTX
Multiple VRXs can view the stream from the same VTX (assuming they share encryption keys) and are on the same channel.
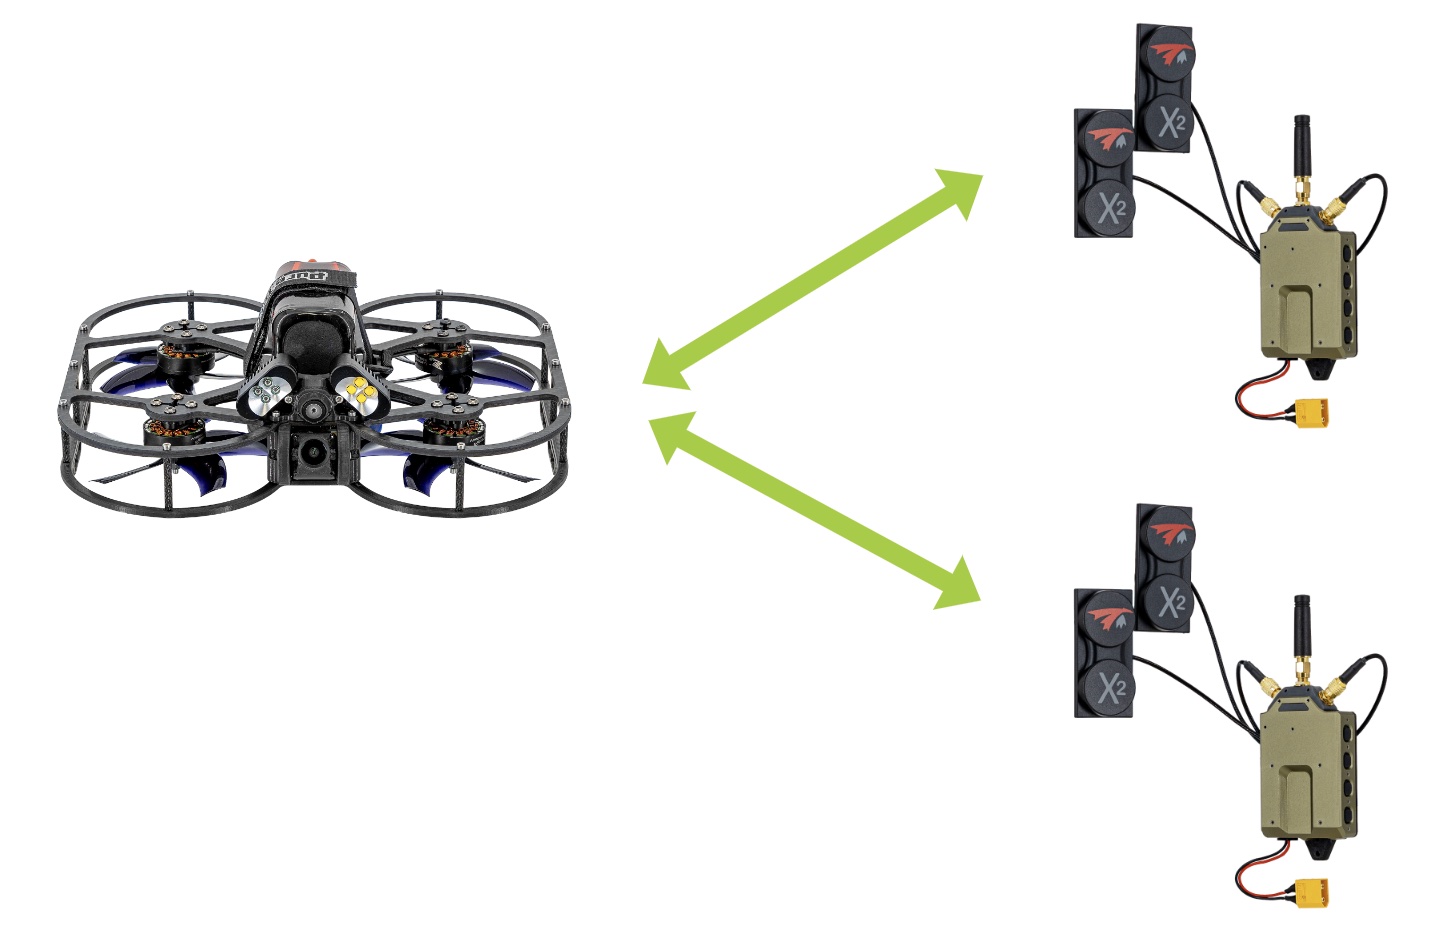
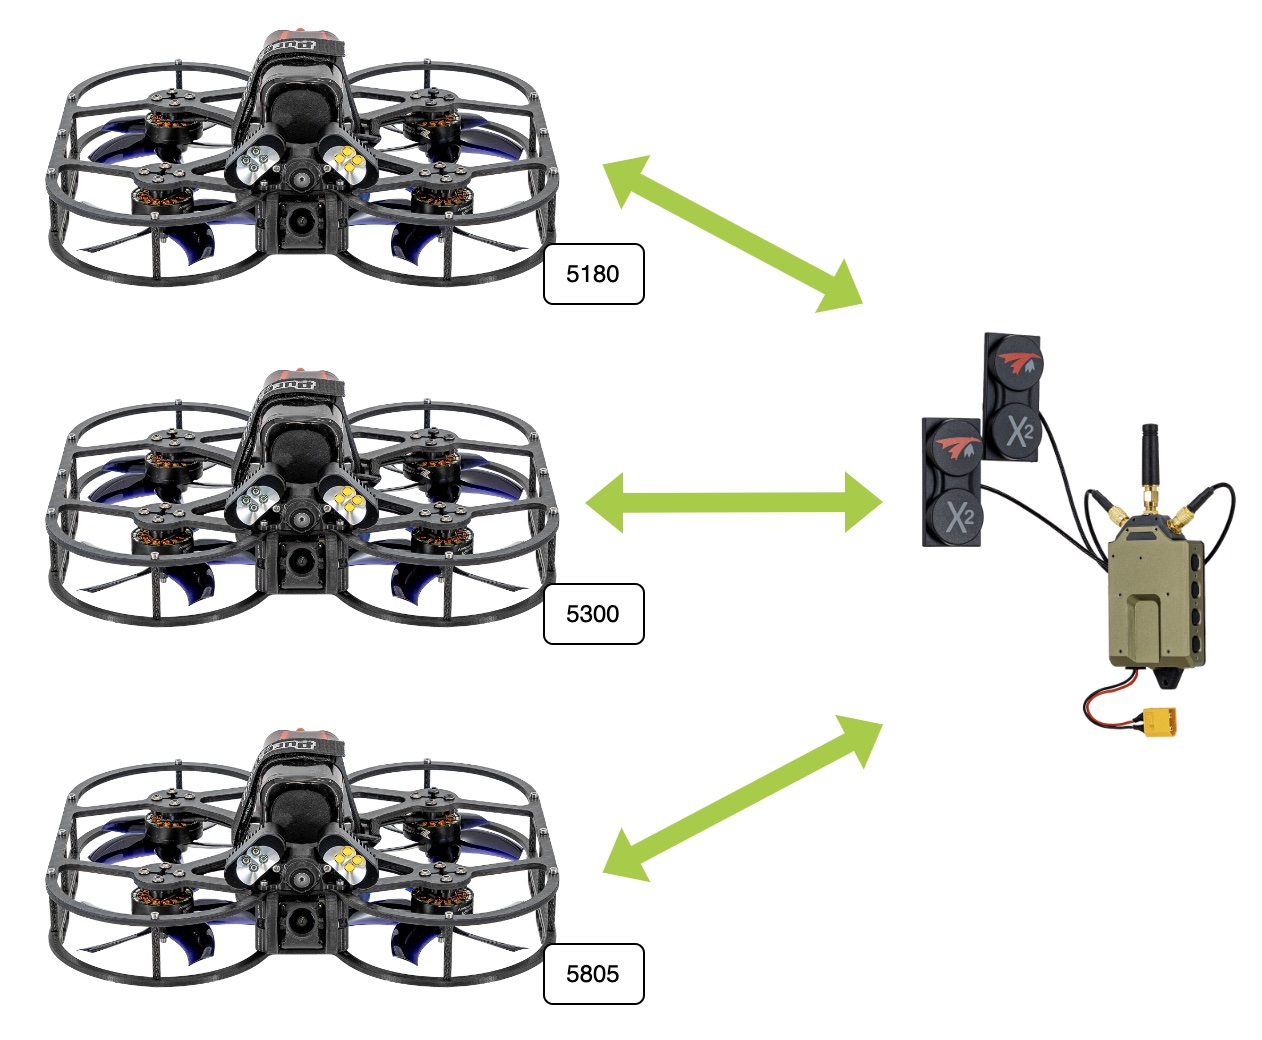
Viewing Multiple VTX from Single VRX
Again assuming the VTXs and VRXs share the same encryption keys, we can stream from multiple VTXs to a VRX (or again multiple VRXs…).
For this use case, we need to first configure the VTXs to be on different channels. The procedure is as follows:
Setup:
- Ensure VTXs/VRXs have same encryption key (or are all using the default)
- Power on one VTX at a time
- Change the frequency/channel of the VTX using the OSD menu (see this video at 223 seconds as to how to change frequencies/channels)
- Power off the VTX
- Set VRX back to default frequency/channel (5805/161)
- Power on next VTX to setup (assuming its out of the box, default frequency is 5805), and change frequency again off the default. Repeat for N VTXs.
Usage:
- All VTXs and VRX can be powered on now
- Using the Channel Scan buttons, you can scan through the available streams from the VTXs
Video Streaming over IP Networks
Overview
Another use case the VTX/VRX system supports is streaming over IP networks.
The pilot can view the low latency video via goggles connected to Display Port output of the VRX.
Different modem types can be be used, where we capture below USB-to-Ethernet, Doodle Labs, and LTE use cases.
If using LTE, both drone and VRX can be configured with VPN clients and can stream over through a network a VPN server facilitates. Tailscale VPN client ships in VOXL2 starting SDK 1.6.
Additionally, the voxl-joystick-server can be used to send RC over MAVLink to a drone for command and control, plugging a controller into a USB hub connected to the AUX USB port.
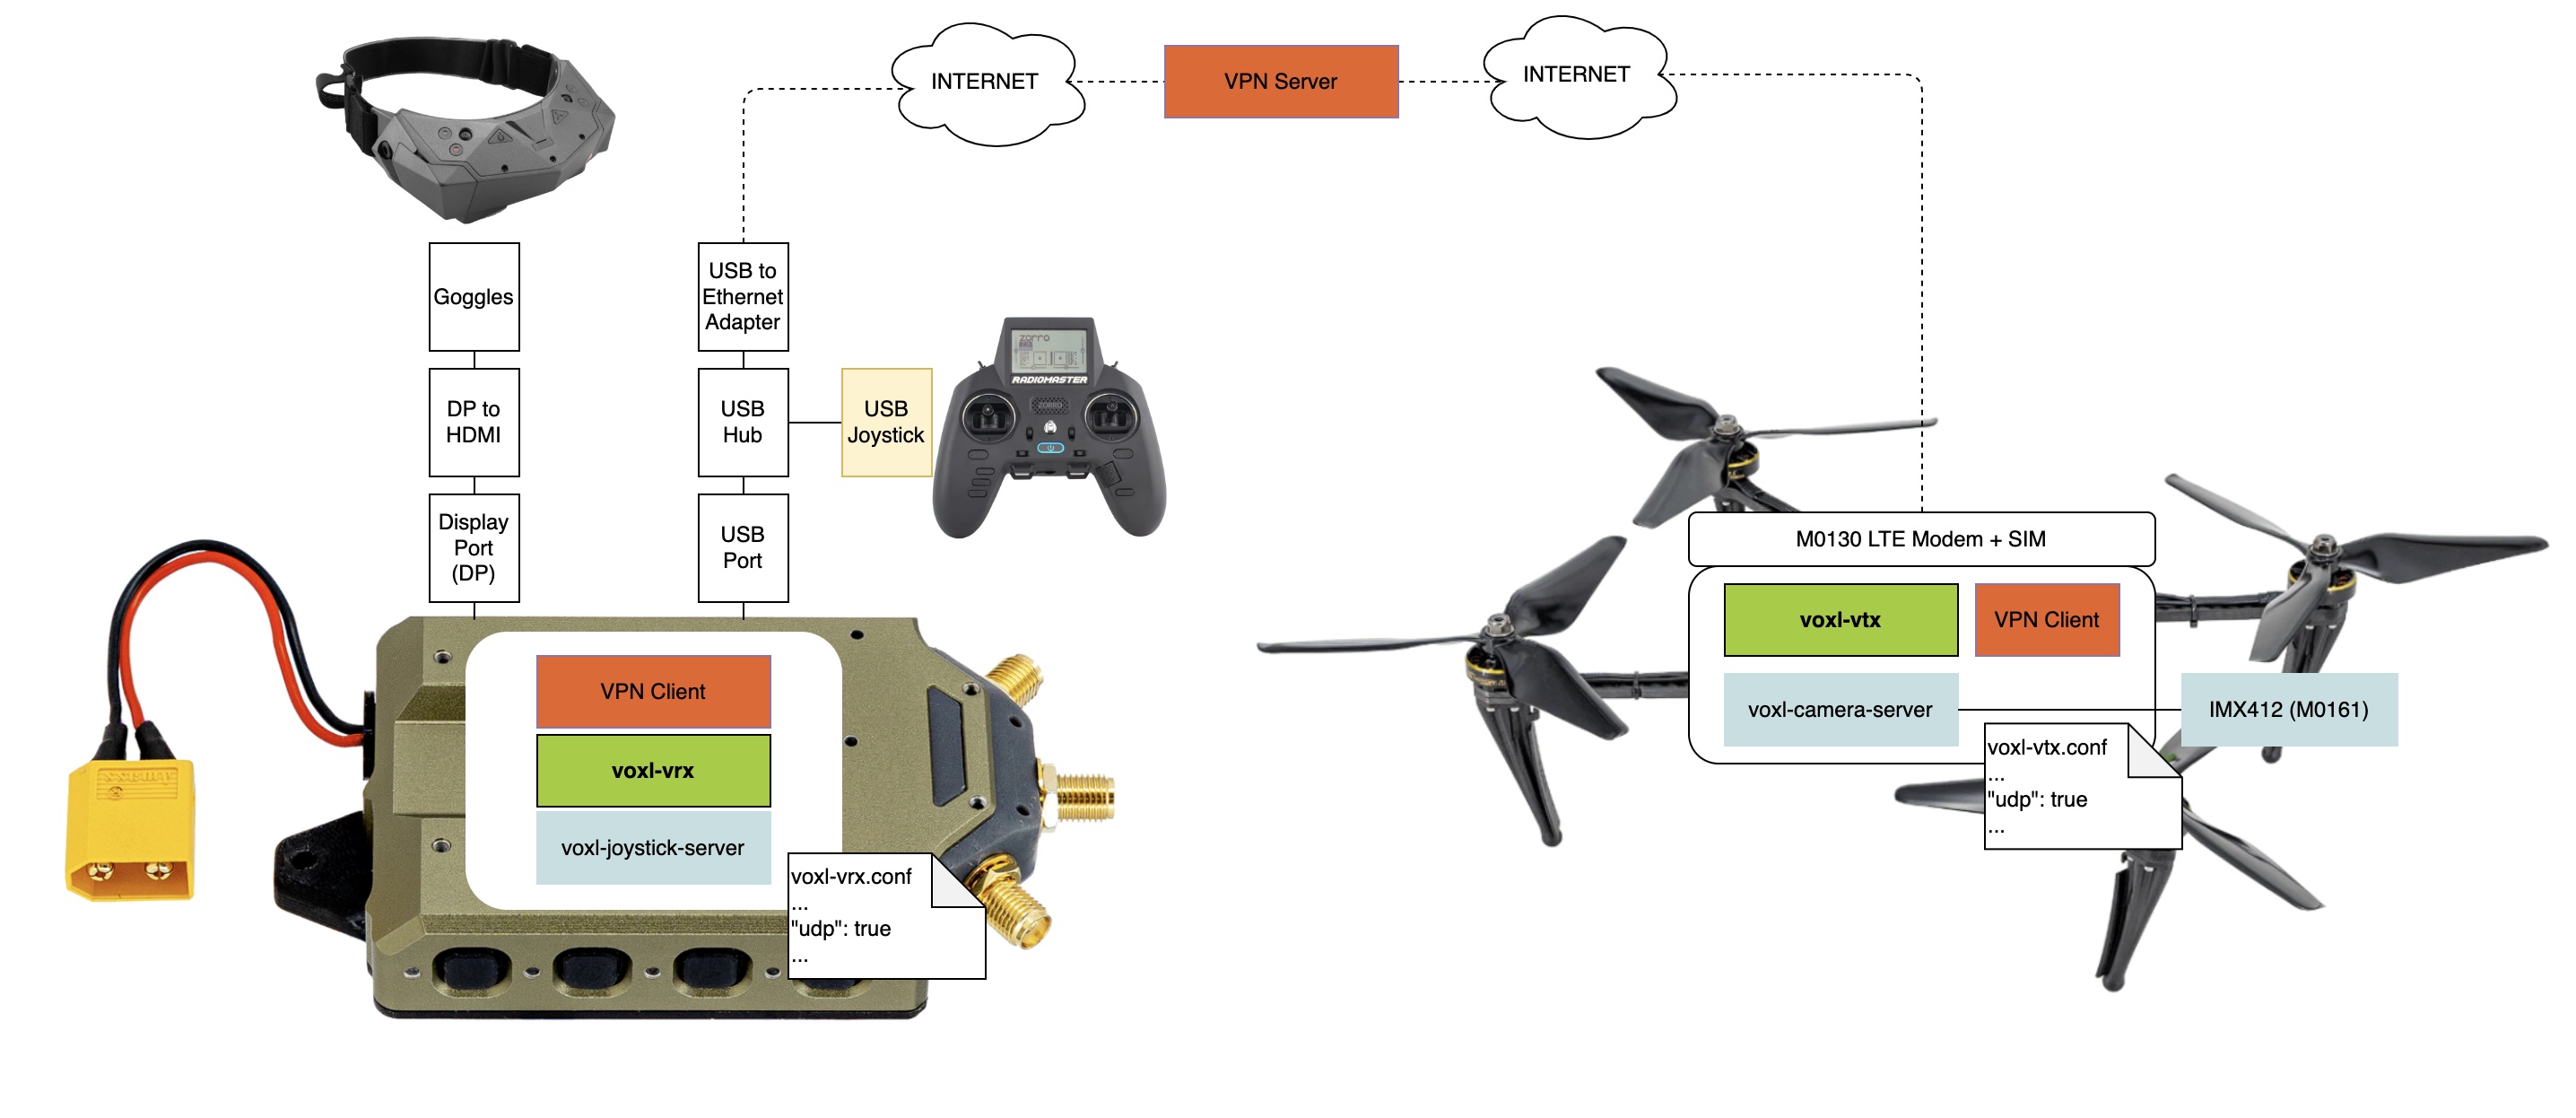
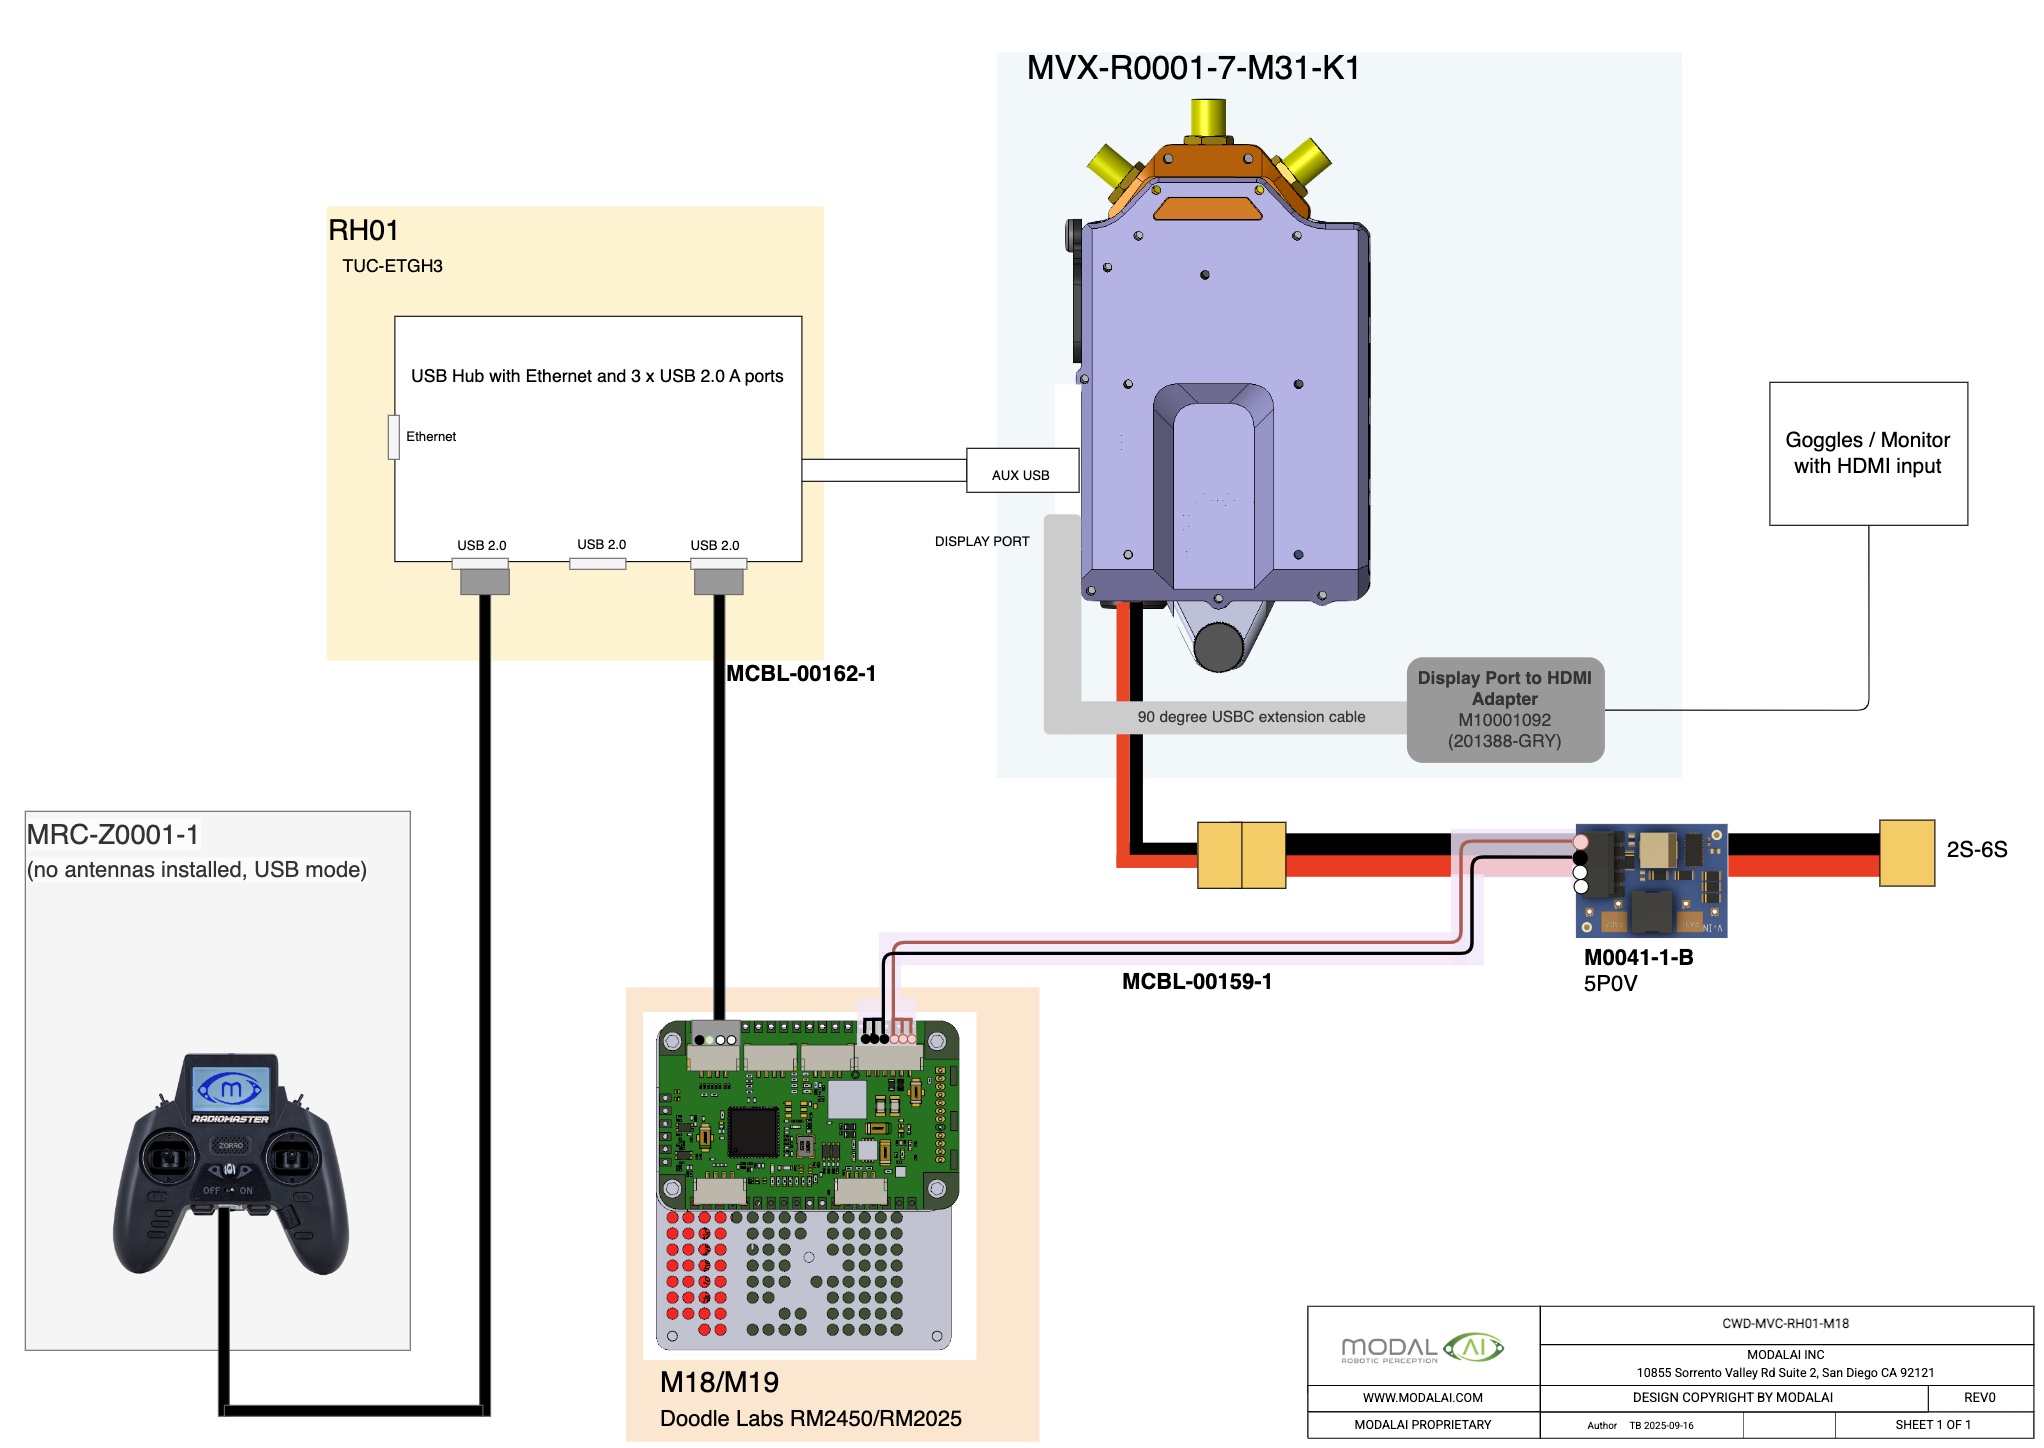
Block Diagrams
The block diagram below describes this architecture:
- the VRX is connected to the internet via USB-to-Ethernet
- the UAS/VTX is connected to the internet with LTE
- both UAS/VTX are connected to the same IP network using a VPN
- the VTX is configured to send UDP traffic to the VRX IP address(es) / port.
- a user can view the video stream from the DisplayPort Out with HDMI adatper to googgle/display
VRX Software Configuration
To enable receiving IP traffic (UDP really), edit the /etc/modalai/voxl-vrx.conf file.
| Name | Type | Required | Description |
|---|---|---|---|
udp | bool | Yes | false - don’t transmit over UDP, true - transmit over UDP |
udp_ip | string | Yes | IP address of the local interface (the VRX) |
udp_port | string | Yes | the UDP port the transmitter is sending to (see udp_receiver_configs->port) |
For example:
...
	"udp":	true,
	"udp_ip":	"100.223.0.101",
	"udp_port":	50000,
...
VTX Software Configuration
To enable this use case on the UAS, edit the /etc/modalai/voxl-vtx.conf file:
| Name | Type | Required | Description |
|---|---|---|---|
udp | bool | Yes | false - don’t transmit over UDP, true - transmit over UDP |
udp_transmitter_ip | string | Yes | IP address of the transmitter IP (the VTX/UAS) on the interface specified |
udp_receiver_configs | object | Yes | List of IP/port pairs to transmit to |
└─ ip | string | Yes | IP address of the VRX |
└─ port | integer | Yes | Port the VRX software is configured to listen on |
For example, set udp_transmitter_ip to the IP of interface on the trasmitter/VTX/UAS side, and the reciever IP/ports that you want to send data to:
...
    "udp": true,
    "udp_transmitter_ip": "10.223.0.100",
    "udp_receiver_configs": [
        {
            "ip": "10.223.0.101",
            "port": 5000
        }
    ],
...
Interface Options
Ethernet Adapter
The VRX’s AUX USB port can be used to add an Ethernet adapter (like the TUC-ETGH3).
When the VRX is connected to an IP network, we can send video over IP instead of RF.
When an Ethernet adapter is attached to AUX USB, it will by default get a static IP (see Static IP from VRX with USB-to-Ethernet below).
eth0: flags=4163<UP,BROADCAST,RUNNING,MULTICAST>  mtu 1500
        inet 10.0.0.2  netmask 255.255.255.0  broadcast 10.0.0.255
        ether 00:30:1a:3b:86:9e  txqueuelen 1000  (Ethernet)
        RX packets 253  bytes 64410 (64.4 KB)
        RX errors 0  dropped 0  overruns 0  frame 0
        TX packets 467  bytes 27898 (27.8 KB)
        TX errors 0  dropped 0 overruns 0  carrier 0  collisions 0
Doodle Labs
The following shows how to configure a Doodle Labs modem setup to be used with the VRX system.
First follow VRX Software Configuration and VTX Software Configuration sections above.
On the VRX, to setup the Doodle Lab modem connected over USB, you will need to:
- ADB on to the VRX (see
ADB Access to VRXbelow). - run
voxl-configure-modem doodle-vrx
This will setup a new interface with default IP 10.223.0.101.
In this case it’s eth1, as we have a USB-to-Ethernet dongle on eth0.
eth1: flags=4099<UP,BROADCAST,MULTICAST>  mtu 1500
        inet 10.223.0.101  netmask 255.0.0.0  broadcast 10.255.255.255
        ether 78:2d:7e:14:f9:4d  txqueuelen 1000  (Ethernet)
        RX packets 0  bytes 0 (0.0 B)
        RX errors 0  dropped 0  overruns 0  frame 0
        TX packets 0  bytes 0 (0.0 B)
        TX errors 0  dropped 0 overruns 0  carrier 0  collisions 0
You can interface with the Doodle Labs modem using the doodl-cli tool that ships in the SDK.
On VRX, for example to get the IP address of the Doodle,
voxl2:/$ doodle-cli -i
10.223.0.101
xxxx::138f:beb0:e79b:xxxx
For VTX/UAS side, for reference, the following could be done with a Doodle Labs enabled VOXL UAS:
- ADB onto VTX/UAS
- run:
voxl2:/$ voxl-configure-modem doodle
The VTX/UAS side should get an interface like:
eth0: flags=4163<UP,BROADCAST,RUNNING,MULTICAST>  mtu 1500
        inet 10.223.0.100  netmask 255.0.0.0  broadcast 10.255.255.255
        ether 00:30:1a:3b:86:a6  txqueuelen 1000  (Ethernet)
        RX packets 1242  bytes 209966 (209.9 KB)
        RX errors 0  dropped 0  overruns 0  frame 0
        TX packets 2054  bytes 108812 (108.8 KB)
        TX errors 0  dropped 0 overruns 0  carrier 0  collisions 0
LTE
First follow VRX Software Configuration and VTX Software Configuration sections above.
Then foloow the information on VOXL SDK LTE software setup
For hardware:
- On VTX side - you could use LTE hotspot with Ethernet out and plug into the Ethernet port of the USB-hub option above.
- On the VTX - insetad of the VTX modem, we can use an IP based modem like the M0130 LTE modem/antennas/SIM card, e.g. similar to this.
Static IP from VRX with USB-to-Ethernet
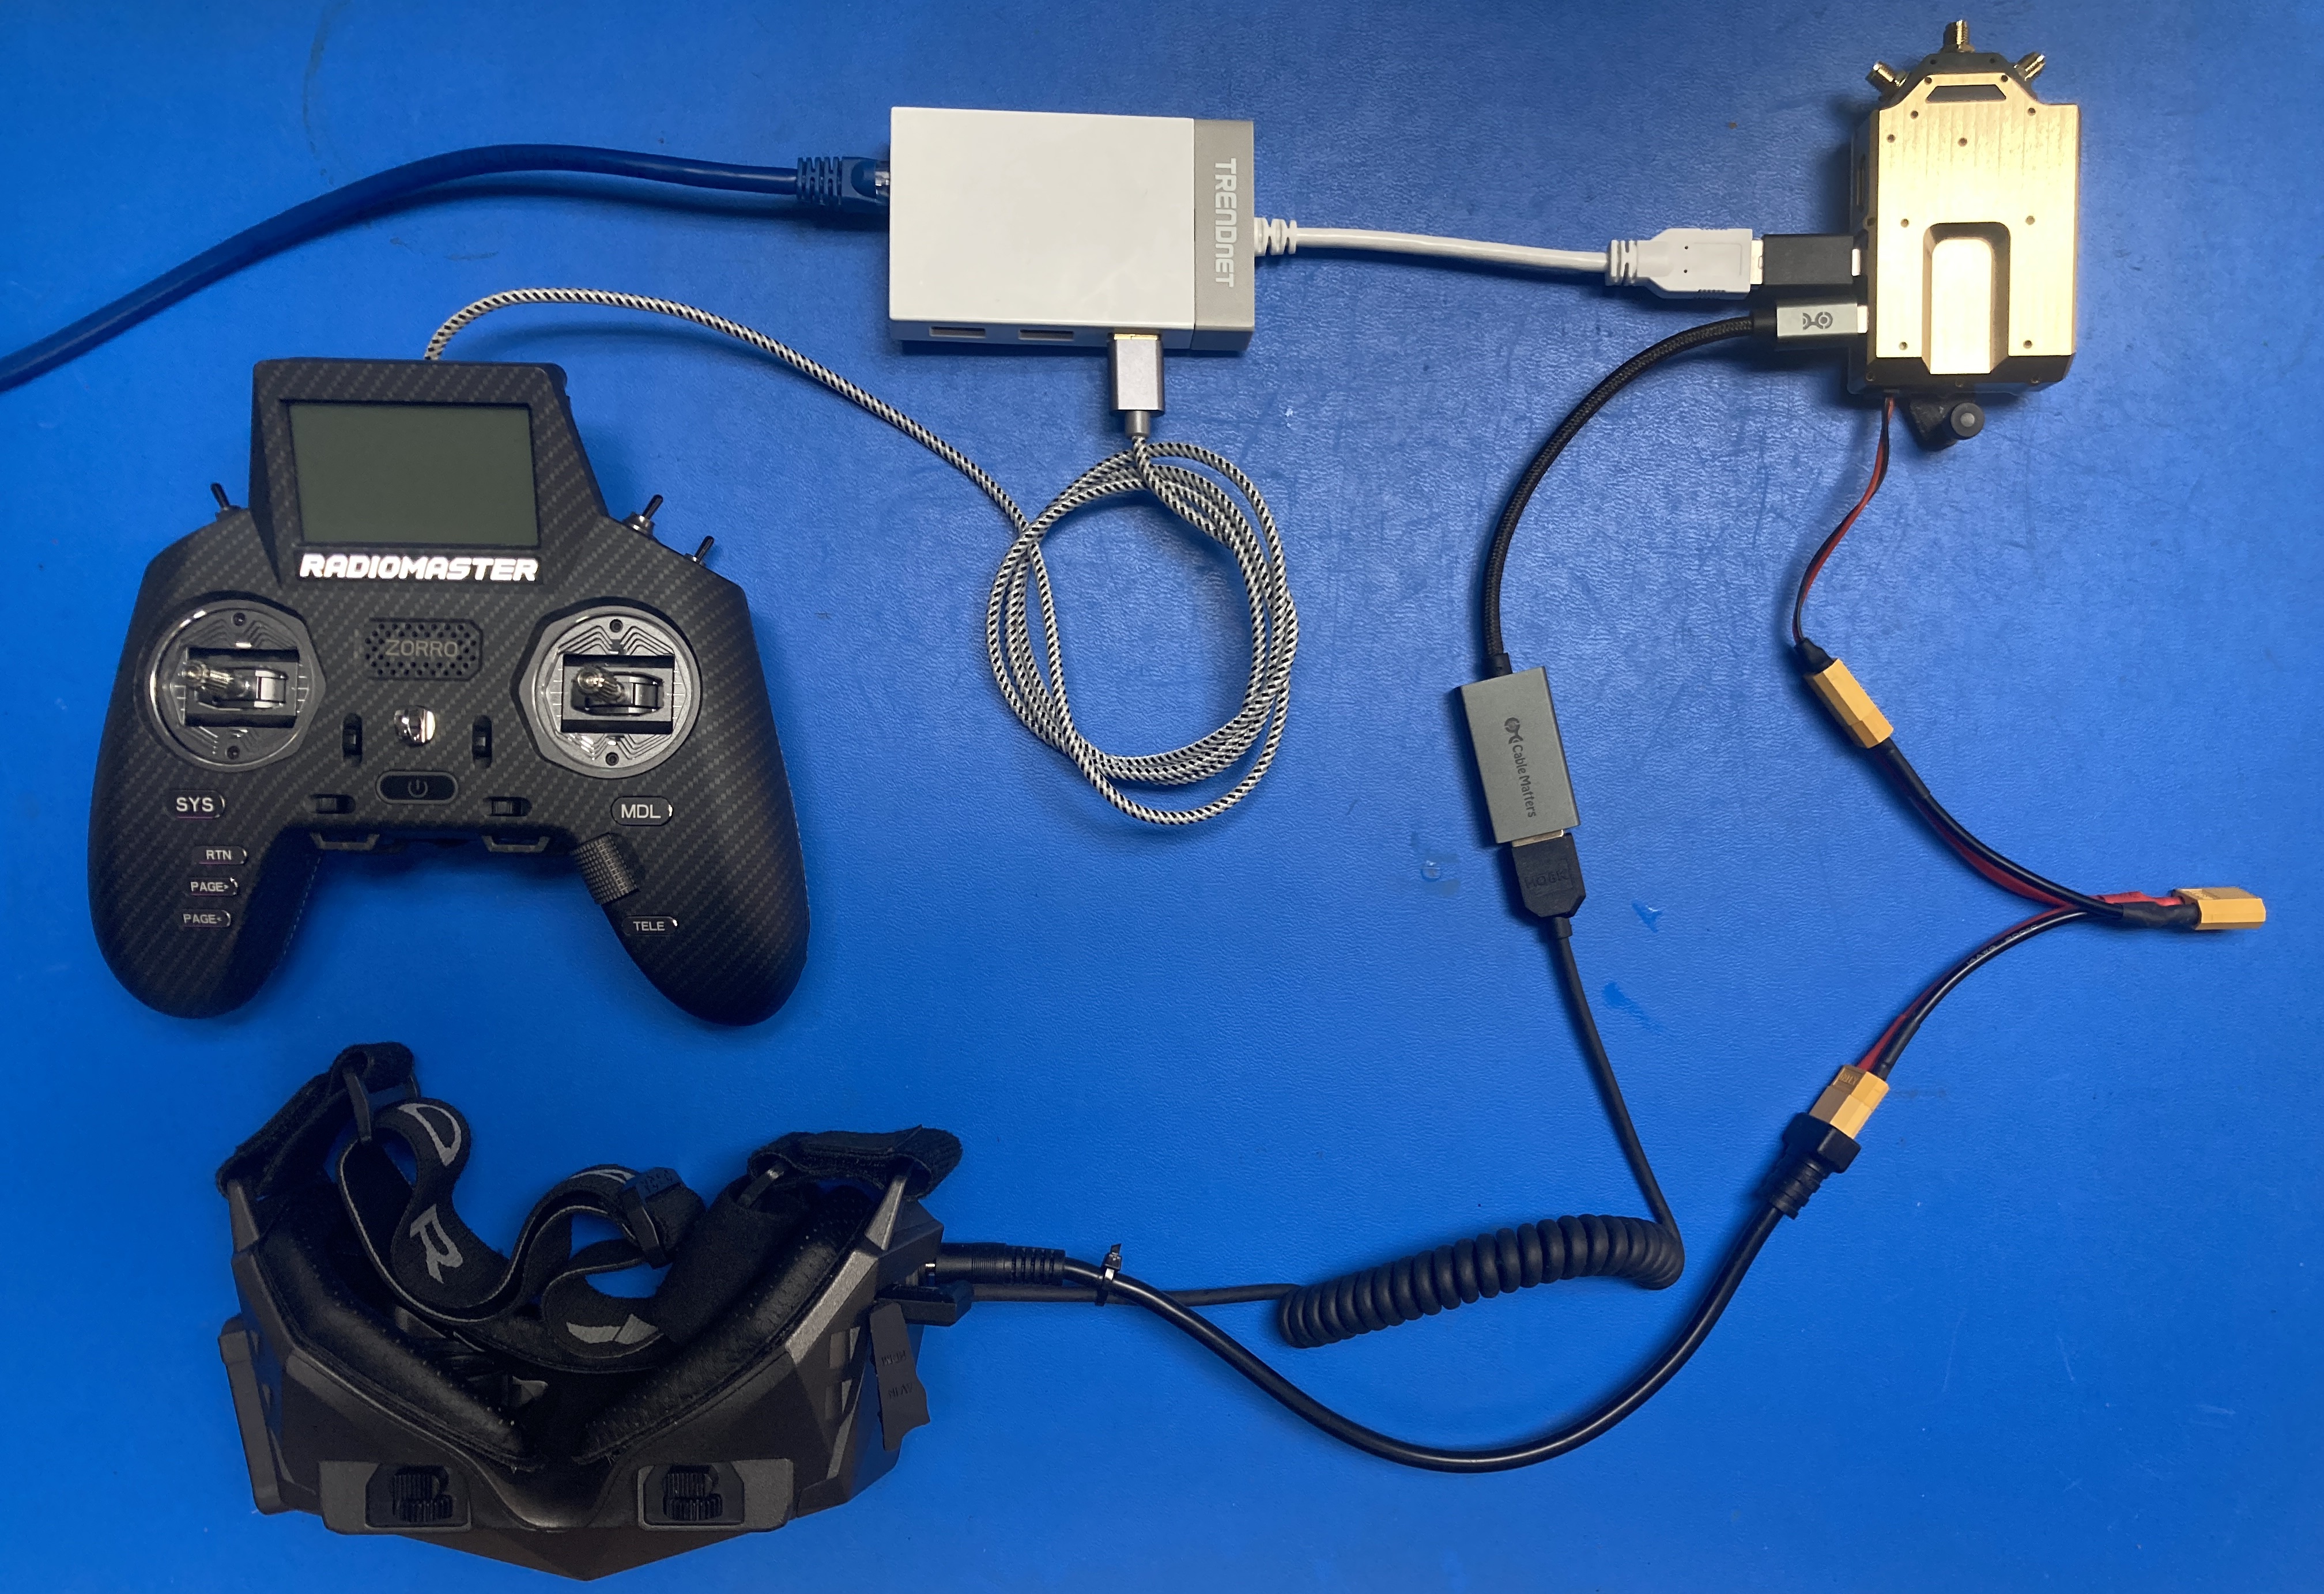
Using a USB-to-Ethernet adapter (and sommetimes a USBC to USBA adapter like in belows setup), you can easily get an IP connection with the VRX.
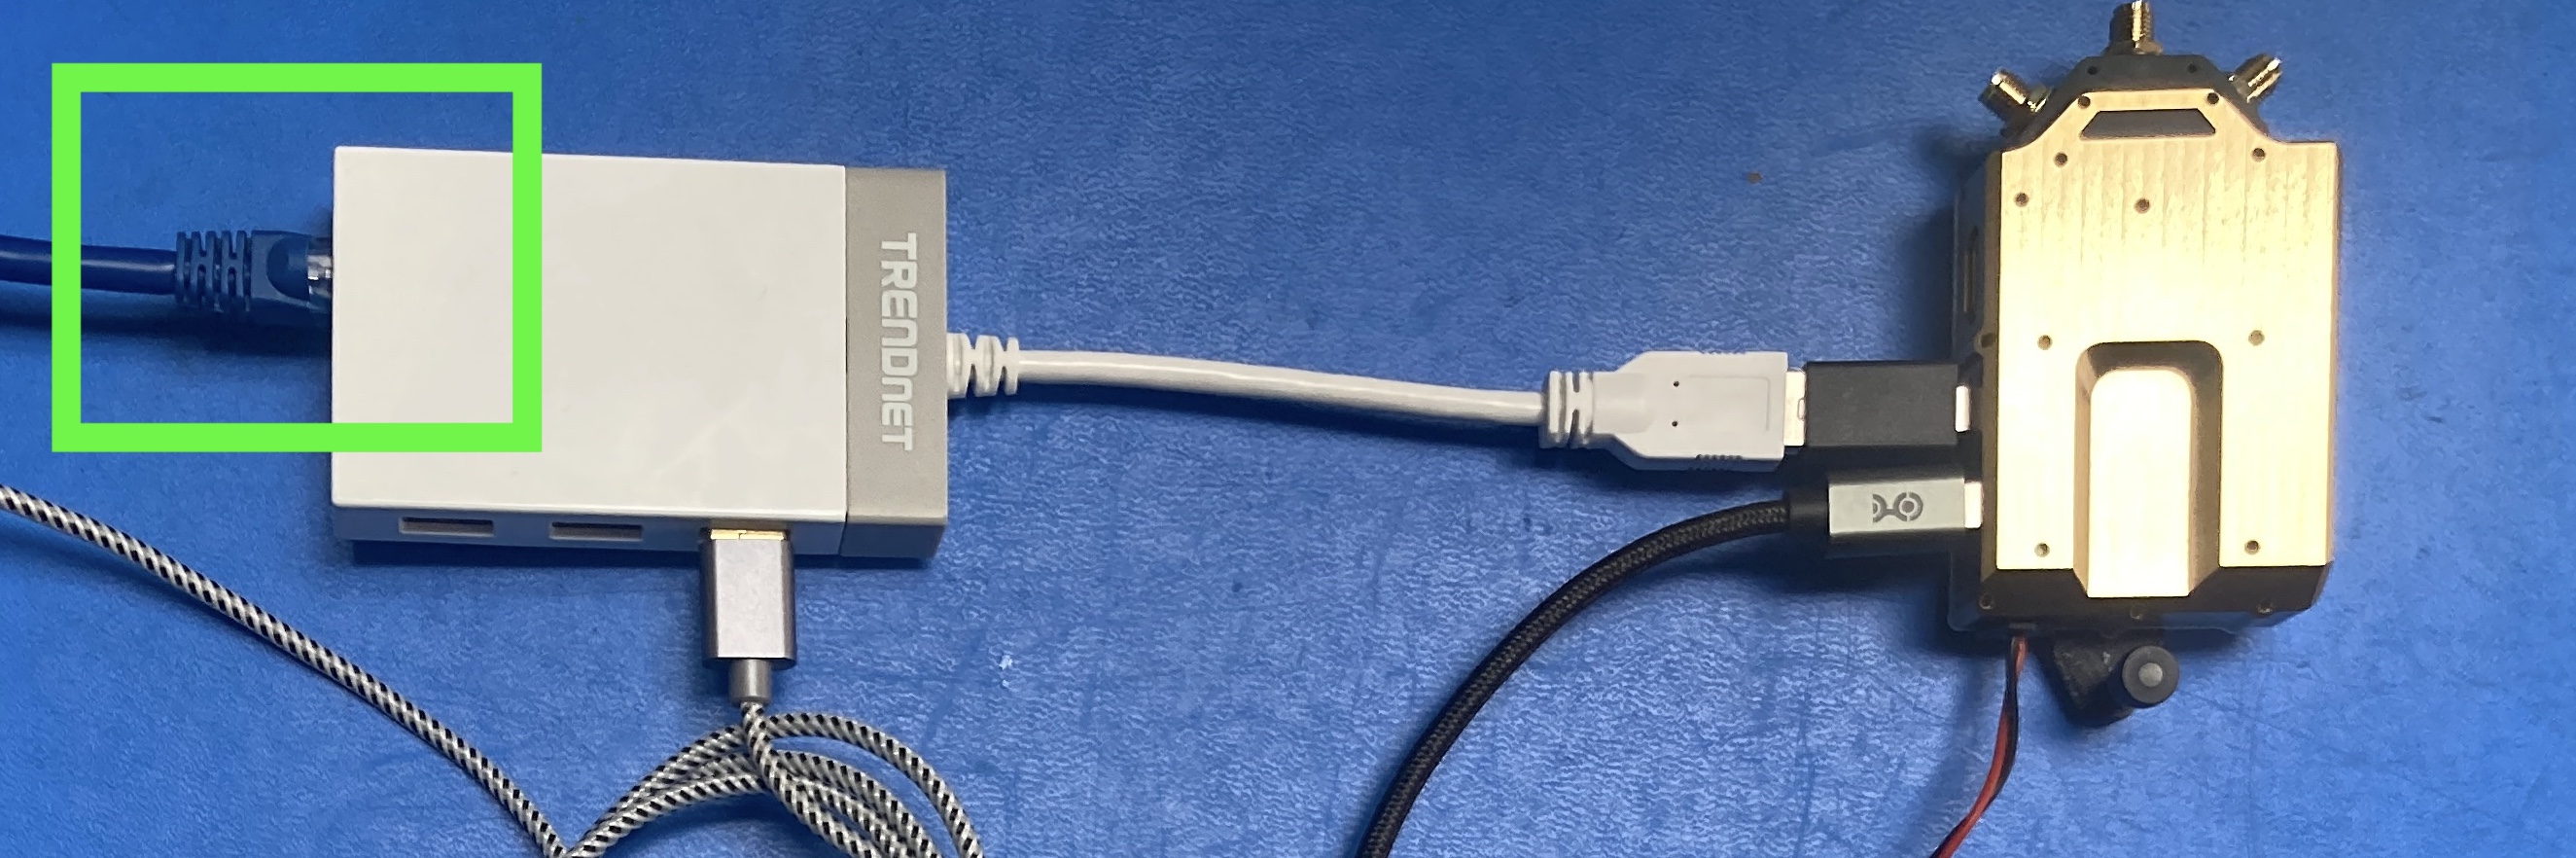
Starting in SDK 1.6, the voxl-static-ip-watcher service will run by default on the VRX.
When you plug in a USB to Ethernet dongle to the AUX port, it enumerates as eth0, and will be assigned static IP 10.0.0.2 with default netmask 255.255.255.0
If you want to customize this, edit /etc/systemd/system/voxl-static-ip-watcher.service.
Environment=NETWORK_INTERFACE=eth0
Environment=STATIC_IP=10.0.0.2
Environment=DEBUG=0
Environment=NETMASK=255.255.255.0
RTSP Stream From VRX
The voxl-streamer services runs on the VRX by default and exposes an RTSP endpoint at rtsp://10.0.0.2:8900/live.
If the VTX is off, you should get a “black screen” for the feed.
SSH Access to VRX
After getting an IP connection following the previous setup, you can get an SSH connection.
NOTE: The static IP functionality is supported in SDK 1.6.X and newer
ssh root@10.0.0.2
(password: oelinux123)
ADB Access to VRX
To access the VRX via ADB, disconnect the USB-C to HDMI adapter from the VRX and connect your USB-C cable to the same USB-C port.
adb shell
See the Interfaces section of the VRX Ground Unit Quick Start Guide for more details.
voxl-joystick-server Setup
NOTE: voxl-joystick-server requires SDK 1.5.0+, recommend 1.6+
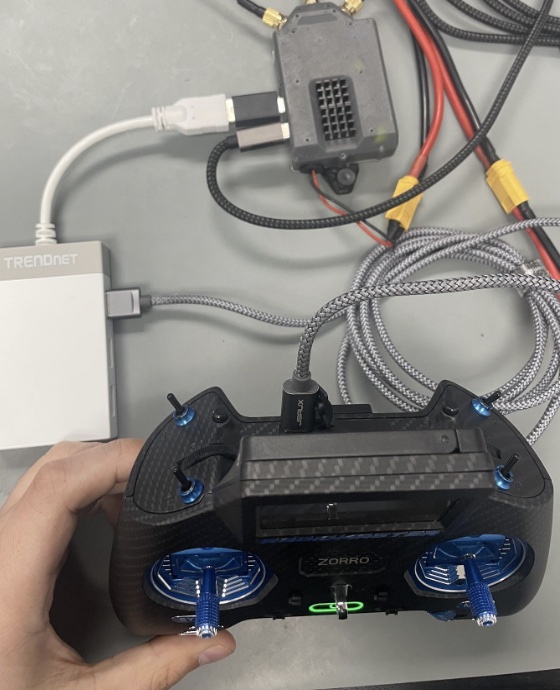
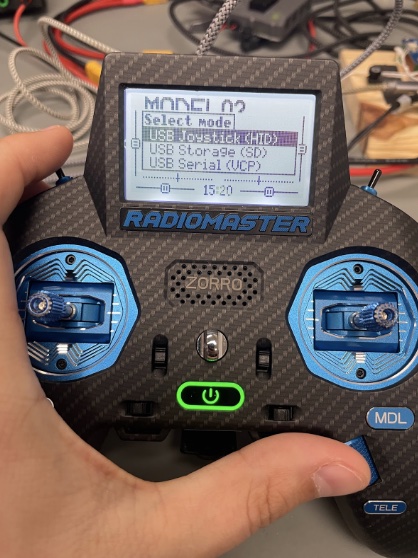
USB Mode
- Connect USB C from USB HUB in VRX to RadioMaster Zorro and hold the power button to power on
- Use the scroll wheel to set transmitter to “USB Joystick (HID)” mode. Press the scroll wheel to select mode
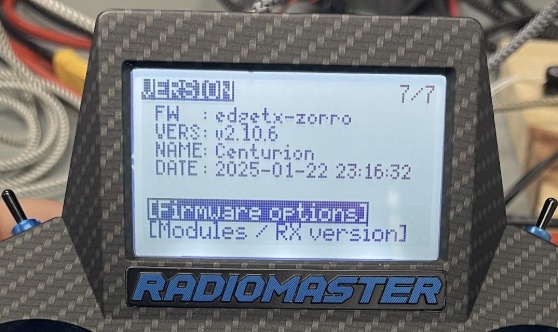
- Confirm that edgeTX version is v.2.10+
- Press “SYS” button, this will bring you to the “TOOLS” Page
- Press “PAGE<” button to Navigate left to the “VERSION” Page
- Confirm edgeTX version is >= v2.10 (ex: VERS: v2.10.6)
- If you need to upgrade, instructions can be found here
- How to get TX into DFU found here
Joystick Configuration
Mixes setup
- Navigate to the Model Selection Menu
- Navigate to the “MIXES” page
- Assign CH1-4 to be axes: pitch, roll, thrust, and yaw
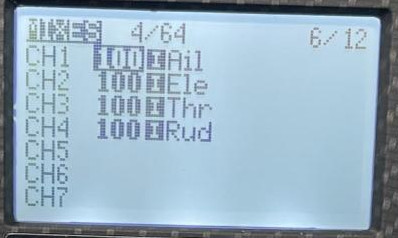
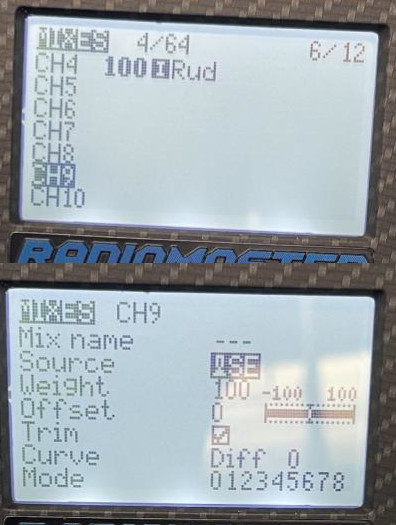
- Assign buttons/switches to CH9 or higher, these will be referenced in the Joystick Axes and Switches/Buttons Setup section below
- Select each channel to be used and set the source as the physical button/switch you want to be linked to that channel
Joystick Axes and Switches/Buttons Setup
- Navigate to the Model Selection Menu
- Navigate to the “SETUP” page
- Scroll all the way to the bottom until you see the “USB Joystick” section
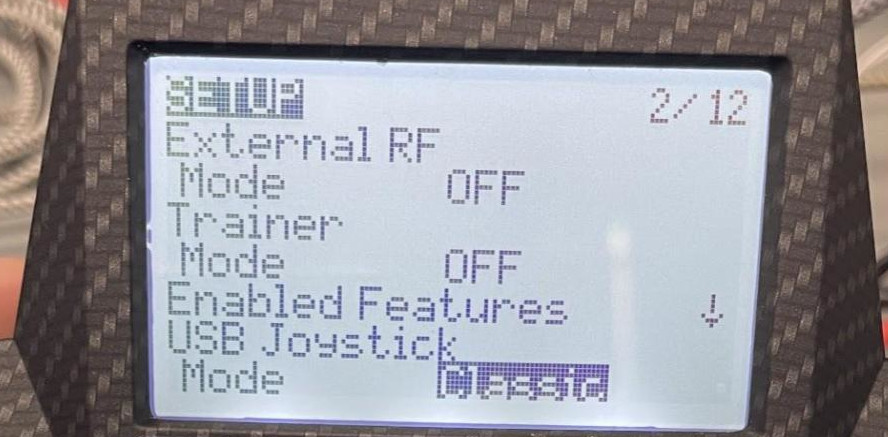
- In the “USB Joystick” section:
- Set “Mode” to “Advanced”
- Set “If.mode” to “Joystick”
- Set “Circ. cut” to “None” (Pilot should verify this is what is desired)
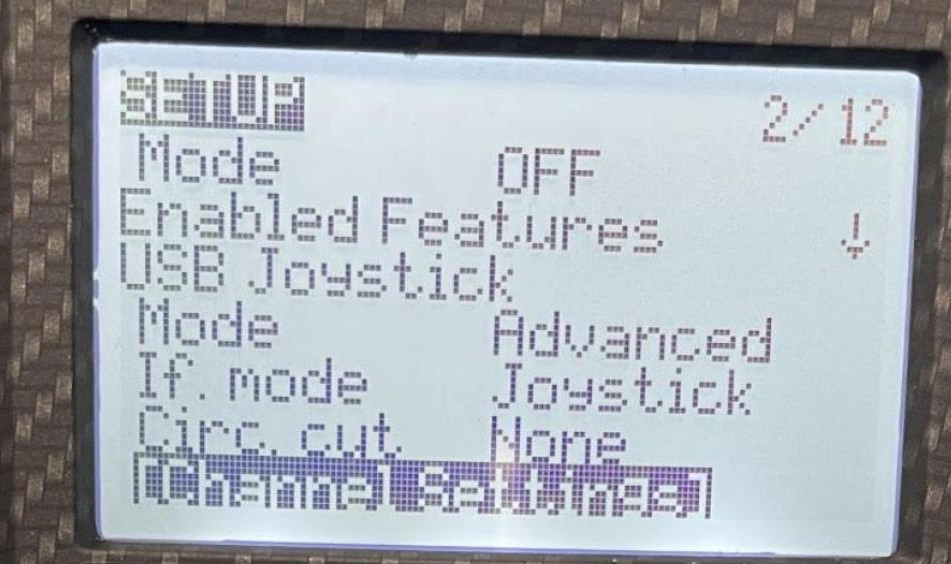
- Navigate down to “[Channel Settings]” and select enter to enter the menu
- Setup X,Y,Z and rotations on channels (1-8) or whichever order you want them to be in if applicable
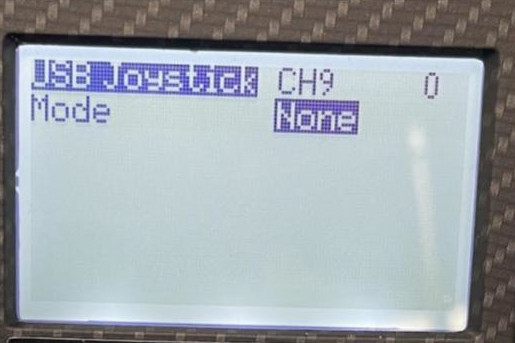
- The channel(s) used for switches/buttons need to be on channel 9 or above
- More information can be found in the EdgeTX Manual
- Navigate to a channel you want to assign a button/switch on your RC to, then click edit
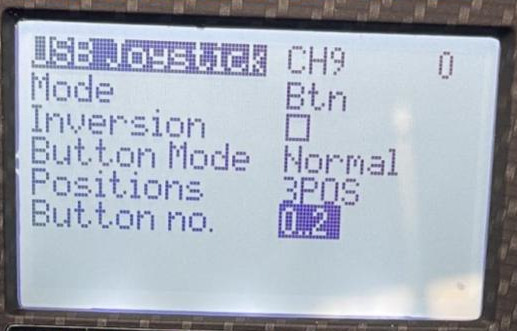
- Set “Mode” to “Btn”
- Set “Positions” to either “2POS”, “3POS”, or whatever type is relevant depending on the physical switch it will be attached to
- Set “Button no.” to be the button numbers that you want this switch to populate
- For example, for a 2POS switch a user can set the button “0..1”, “1..2”, etc depending on which button numbers are already in use (A warning “!Button no. collision!” will appear if the range you are trying to use is already in use)
- Repeat the steps above for all buttons you want to setup
Application Configuration
- ADB or SSH onto the VRX
- Run
voxl-configure-joystick-server -wand then select “3” for “Settings”
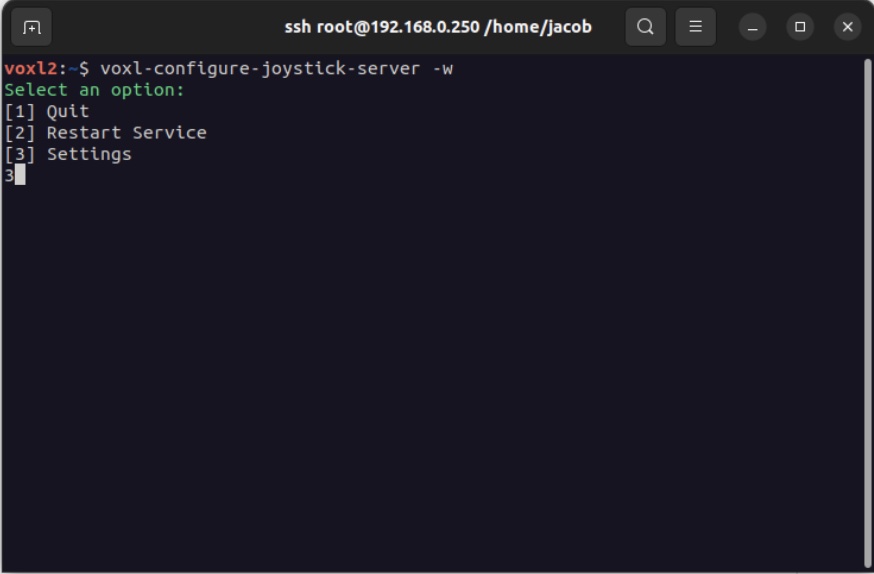
- Now assign the X, Y, Z, and R channels to roll, pitch, yaw, and throttle
- Descriptions from mavlink manual_control header file:
- X: X-axis, normalized to the range [-1000,1000]. Generally corresponds to forward(1000)-backward(-1000) movement on a joystick and the pitch of a vehicle.
- Y: Y-axis, normalized to the range [-1000,1000]. Generally corresponds to left(-1000)-right(1000) movement on a joystick and the roll of a vehicle
- Z: Z-axis, normalized to the range [-1000,1000]. Generally corresponds to a separate slider movement with maximum being 1000 and minimum being -1000 on a joystick and the thrust of a vehicle. Positive values are positive thrust, negative values are negative thrust.
- R: R-axis, normalized to the range [-1000,1000]. Generally corresponds to a twisting of the joystick, with counter-clockwise being 1000 and clockwise being -1000, and the yaw of a vehicle.
- Update Rate: Optionally increase the update rate
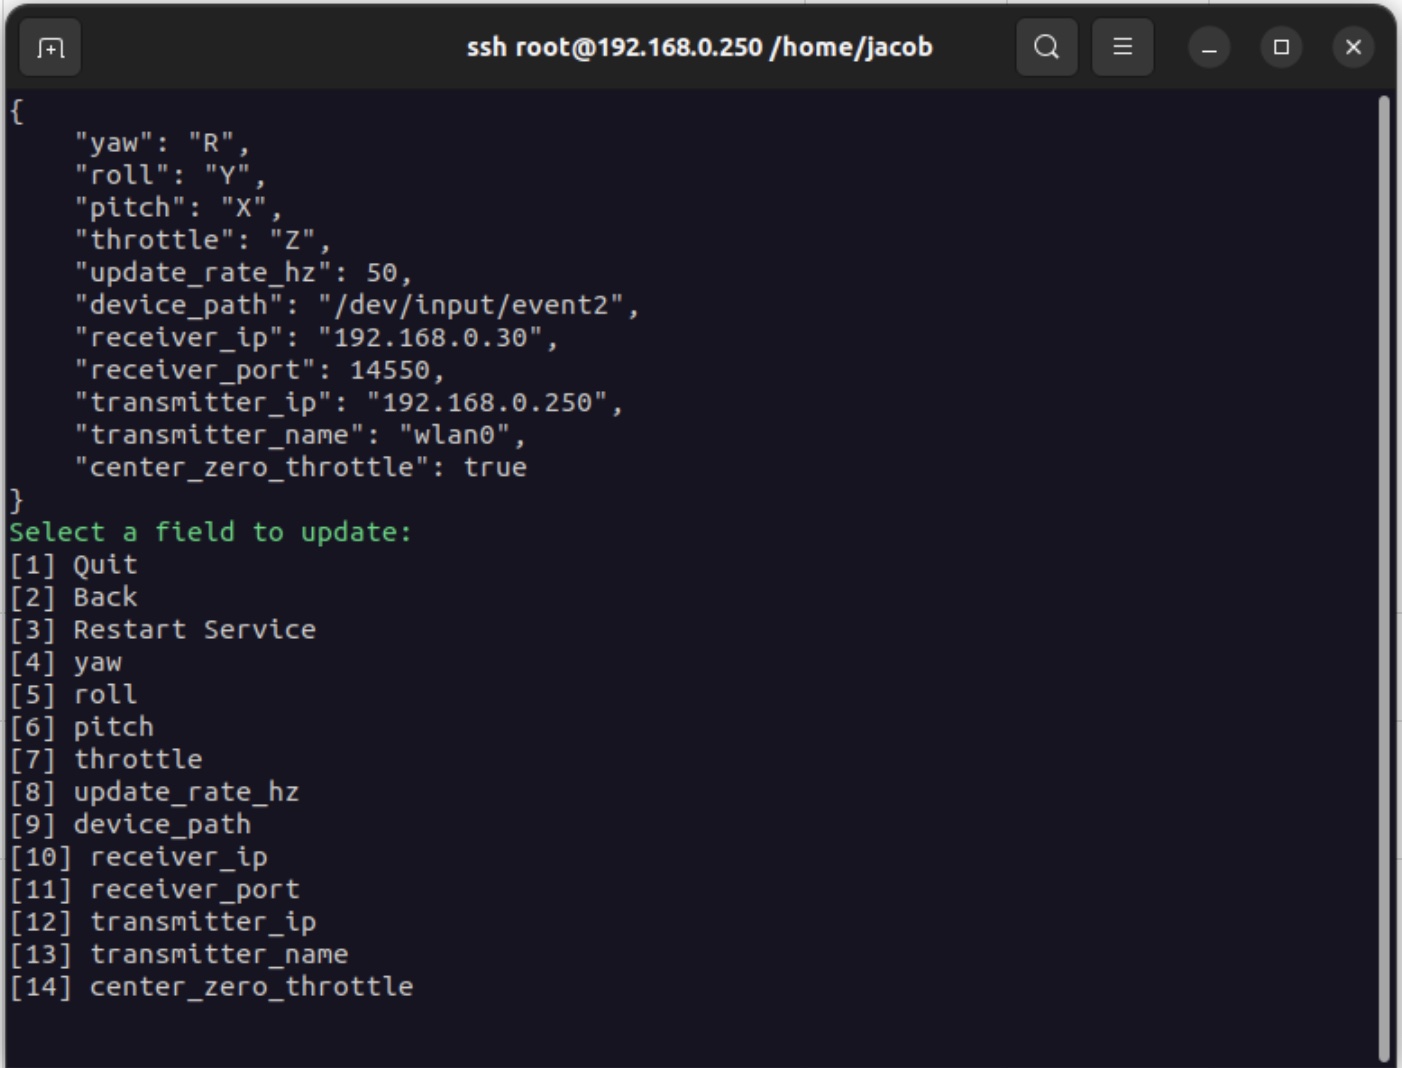
- Now decide how you want to throttle to behave: Zero throttle at center stick or full range.
- Set center_zero_throttle to true if you want the center stick position to be zero throttle. Otherwise, set center_zero_throttle false
- Now provide the file path to your Joystick, the default config here should work, typically on VRX this will be
/dev/input/event2. If the defauly path doesn’t work, you may need to watch this directory as you plug in your Joystick to determine which event is linked to your Joystick. - Now setup the network connection
- Receiver: receiver_ip should be the IP address of the drone and receiver_port should remain as the default (14550) as this is the port that voxl-mavlink-server listens to on the drone.
- Transmitter: transmitter_ip should be the IP address of this device (the VRX). transmitter_name should be the name of the network interface to be used for transmitting the data (likely wlan0, tailscale0, or wwan0)
Troubleshooting
Joystick to VRX interface
To see if the VRX is seeing the Joytick inputs:
- adb on to VRX
- stop the joystick service:
systemctl stop voxl-joystick-server
- manually run with
-doption for debug joystick events
voxl-joystick-server -d
Here is an example output:
voxl2:~$ voxl-joystick-server -d
Found 1 UDP Configurations
Joystick detected: OpenTX Radiomaster TX12 Joystick (/dev/input/event2)
WARNING: No kill switch button provided: -1. Valid options: 0-31.
PITCH: Y
ROLL:  X
YAW:   R
THROTTLE: Z
ARM BUTTON: 0
KILL BUTTON: -1
CENTER ZERO THROTTLE: FALSE
UPDATE RATE: 200Hz
INPUT DEVICE: /dev/input/event2
TX-IP:   10.223.0.101
[1] RX-IP:   10.223.0.100
[1] RX-PORT: 14550

[debug] Debug mode enabled
existing instance of voxl-joystick-server found, attempting to stop it
Device: OpenTX Radiomaster TX12 Joystick
UDPMultiForwarder: add forwarding to: 10.223.0.100:14550
UDPForwarder::configured for 10.223.0.100:14550 via 10.223.0.101
[debug] ev { time=1718656274.505133, type=3, code=0, value=1023 }
[debug] ev { time=1718656274.505133, type=3, code=1, value=825 }
[debug] ev { time=1718656274.505133, type=0, code=0, value=0 }
[debug] ev { time=1718656274.510144, type=3, code=0, value=1042 }
[debug] ev { time=1718656274.510144, type=3, code=1, value=791 }
[debug] ev { time=1718656274.510144, type=0, code=0, value=0 }
Joystick Network Connection to VTX/UAS
To see if the connection is being made from the VRX to the VTX/UAS, do the following:
- adb shell onto VTX/UAS
- manually run the following:
voxl-mavlink-server
When the VRX connects, you should see something like this (where these IPs may be different for your setup)
Added new UDP connection to 10.223.0.101
CONNECTED to GCS at 10.223.0.101
Check For mamual control events From VRX
To see the manual control events originating from the VTX, do the following:
voxl-inspect-mavlink mavlink_from_gcs
Here is an example output:
|   ID  |      Mavlink MSG Name       |Counter|  Hz  |
|-------|-----------------------------|-------|------|
|     0 | heartbeat                   |     7 |  1.0 |
|    69 | manual_control              |  1414 |196.1 |
Check For manual_control_setpoint Events from PX4
 px4-listener manual_control_setpoint

TOPIC: manual_control_setpoint
 manual_control_setpoint
    timestamp: 380219234 (0.003195 seconds ago)
    timestamp_sample: 380218414 (820 us before timestamp)
    roll: 0.99700
    pitch: -0.00100
    yaw: -0.00500
    throttle: -0.99800
    flaps: 0.00000
    aux1: 0.00000
    aux2: 0.00000
    aux3: 1010.00000
    aux4: 1000.00000
    aux5: 0.00000
    aux6: 0.00000
    valid: True
    data_source: 3
    sticks_moving: False
No events?
Make sure voxl-px4 is setup for EXTERNAL RC:
- Check
/etc/modalai/voxl-px4.conf - If wanting to use USB Joystick mode, set
RC=EXTERNAL
Check that the PX4 param COM_RC_IN_MODE is set to 1:
voxl2:/$ px4-param show COM_RC_IN_MODE
Symbols: x = used, + = saved, * = unsaved
x + COM_RC_IN_MODE [249,531] : 1
If not, you can use:
px4 param set COM_RC_IN_MODE 1
AI Detection
For information on setting up AI object detection with real-time bounding box overlay on the video stream, see the AI Detection Setup Guide.