VOXL-CAM Setup
If you have VOXL CAM with Flight Contoller or Modem, start by following this guide
Table of Contents
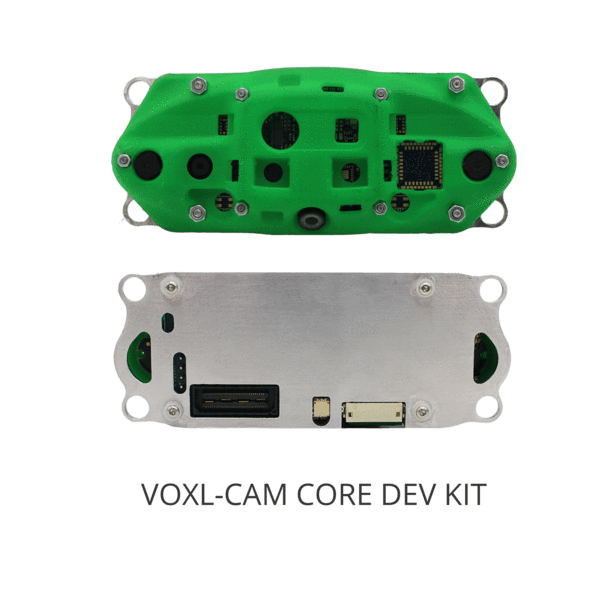
VOXL CAM Core
Kit Includes
- VOXL-CAM
- VOXL Power Module v3
- PS-XT60 Wall Power Supply
- Caddy with Fan for Desktop Development
- USB Cable - Right Angle Micro B
Out of Box Setup
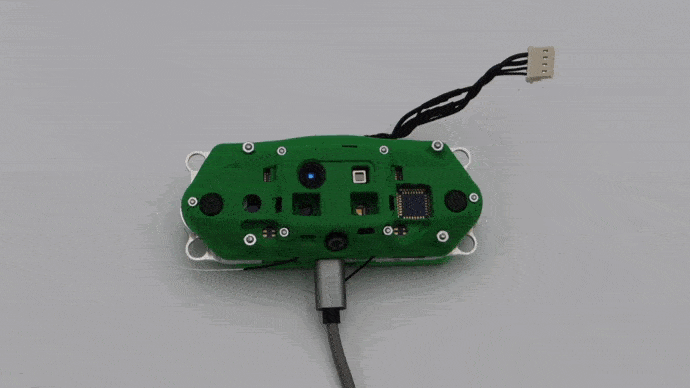
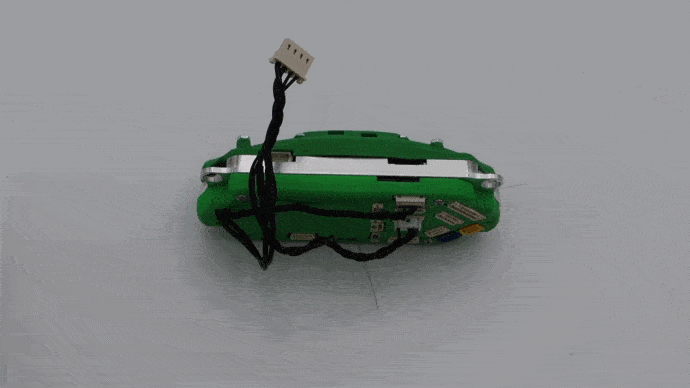
Connect Micro USB to VOXL CAM
If you intend to use adb later, connect right angled USB cable into the VOXL-CAM as shown shown below and connect the other end of the cable to your host computer. Otherwise continue on. 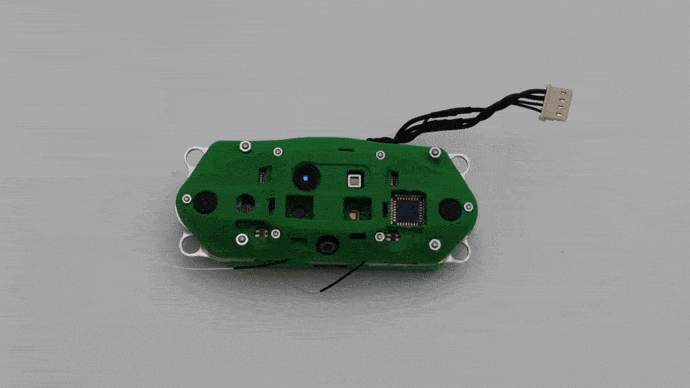
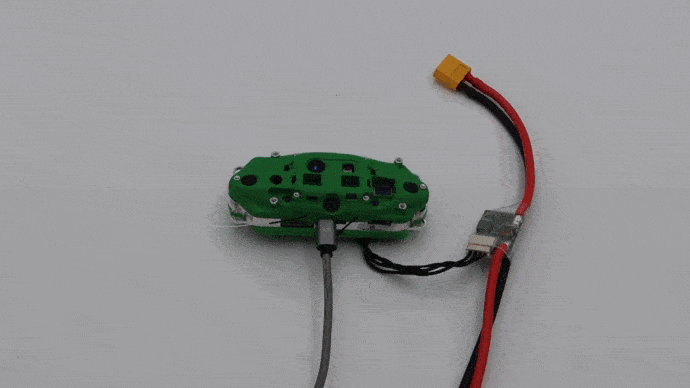
Plug in Power Module
Attach the VOXL Power Module to the power cable as shown below.
WARNING: Keep a fan on the back aluminum plate when the device is powered on in a static state to avoid the unit from overheating.
Place in Caddy for Desktop Development
When doing desktop development, place in the Caddy:
Once VOXL-CAM is in the caddy, plug the VOXL Power Module to a wall outlet using included power supply with XT60 connector. Make sure the fan turns on properly.
Connect to VOXL-CAM
Connect to VOXL-CAM using WiFi
Connect to VOXL-CAM Access Point
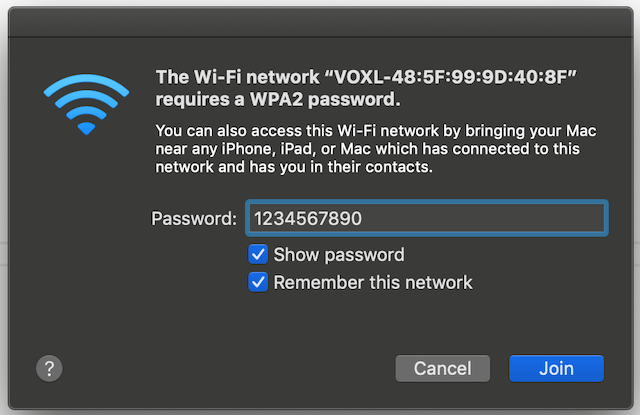
From the factory, VOXL-CAM will power up as a WiFi Access Point with a name like VOXL:XX:XX:XX:XX:XX). You can connect to it with a password of 1234567890.
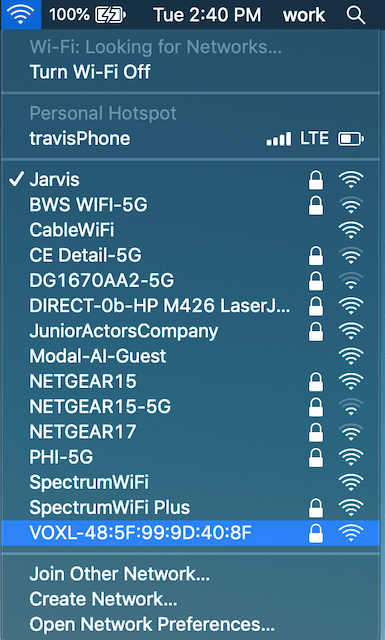
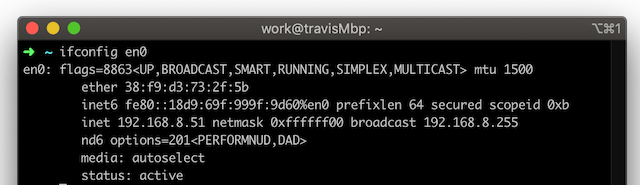
Once connected to the VOXL AP, you’ll get an IP address from VOXL via DHCP, locate the address, in my case it’s 192.168.8.51.
Note: you can connect VOXL-CAM to your wireless network using the voxl-wifi station <SSID> <Password> command to have allow your host computer to have internet while also connected to VOXL-CAM. You will need to locate the IP address, which is easily done with adb and the USB connection.
More details can be found at the VOXL WiFi quickstart page.
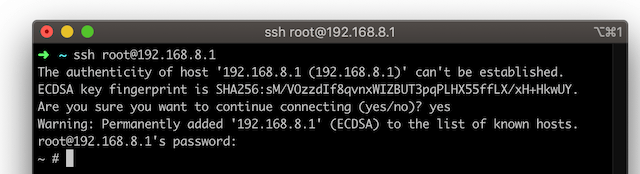
SSH into VOXL
The VOXL’s IP address by default is 192.168.8.1. SSH into VOXL using the root user with password oelinux123.
More details available at the VOXL SSH quickstart page.
Connect to VOXL-CAM with ADB
Alternatively, you can use a usb cable to ADB directly in.
Setup ADB
See here
Connect to VOXL-CAM with ADB
After installing adb, plug a USB cable into Seeker.
Then, run the following:
adb shell
Now you are running a shell inside Seeker’s Ubuntu OS!
SD Cards
VOXL-CAM has two SD card slots. One slot is for VOXL and the other is for the Flight Core (If you have it). To add or remove storage, slide the SD card in. To remove it, push on it, and it will pop out.
Viewing Image Sensor Data
In order to best visualize the point cloud, we recommend voxl-portal. The camera viewing guide can be found here
View Visual Inertial Odometry Data
The Visual Intertial Odometry (VIO) feature uses the tracking image sensor with fisheye lens and an onboard IMU to provide localization data. At a high level, this provides you a realtime “X, Y, Z” in space.
The visual voxl-qvio-server debugging tool, ov-overlay, is available on voxl-portal cameras page.
To see the output of the voxl-qvio-server on the command line, simply run the following command:
voxl-inspect-vins
The output displayed updates as you move the VOXL-CAM around in space:

You can move VOXL-CAM around and see the data update.
Hit CTRL+c to stop the program
Viewing Point Cloud (and Stereo Tracking Images)
In order to best visualize the point cloud, we recommend voxl-portal.
Viewing Point Cloud using RViz and ROS
Software Requirements
- Ubuntu 18.04 or newer
- Setup ROS on PC
- Setup ROS on VOXL (already done on shipped VOXL-CAMs)
- RViz (
apt-get install rviz)
Configuration
Please ensure you’ve setup ROS on PC
The unit’s software is shipped already configured and ready to use.
Note: If needed, you can follow the Software Setup section below to fully reconfigure the VOXL-CAM.
SSH into VOXL-CAM
If not already done, SSH into VOXL-CAM and change the shell to bash:
ssh root@192.168.8.1
~# bash
yocto:~#
Setup the environment (this assumes VOXL-CAM is in SoftAP with IP Address of 192.168.8.1 which is the default):
yocto:~# source /opt/ros/indigo/setup.bash
yocto:~# source ~/my_ros_env.sh
Run the following command to run the MPA ROS Node:
yocto:~# roslaunch voxl_mpa_to_ros voxl_mpa_to_ros.launch
The exepected output is shown:
yocto:~# roslaunch voxl_mpa_to_ros voxl_mpa_to_ros.launch
... logging to /home/root/.ros/log/790d372a-a45e-11eb-ade8-ec5c68cd1ad7/roslaunch-apq8096-4239.log
Checking log directory for disk usage. This may take awhile.
Press Ctrl-C to interrupt
Done checking log file disk usage. Usage is <1GB.

started roslaunch server http://192.168.1.188:36869/

SUMMARY
========

PARAMETERS
 * /mpa/voxl_mpa_to_ros_node/image0_pipe: tracking
 * /mpa/voxl_mpa_to_ros_node/image0_publish: True
 * /mpa/voxl_mpa_to_ros_node/image1_pipe: hires_preview
 * /mpa/voxl_mpa_to_ros_node/image1_publish: True
 * /mpa/voxl_mpa_to_ros_node/image2_pipe: qvio_overlay
 * /mpa/voxl_mpa_to_ros_node/image2_publish: True
 * /mpa/voxl_mpa_to_ros_node/image3_pipe:
 * /mpa/voxl_mpa_to_ros_node/image3_publish: False
 * /mpa/voxl_mpa_to_ros_node/image4_pipe:
 * /mpa/voxl_mpa_to_ros_node/image4_publish: False
 * /mpa/voxl_mpa_to_ros_node/image5_pipe:
 * /mpa/voxl_mpa_to_ros_node/image5_publish: False
 * /mpa/voxl_mpa_to_ros_node/imu0_pipe: imu0
 * /mpa/voxl_mpa_to_ros_node/imu0_publish: True
 * /mpa/voxl_mpa_to_ros_node/imu1_pipe: imu1
 * /mpa/voxl_mpa_to_ros_node/imu1_publish: True
 * /mpa/voxl_mpa_to_ros_node/stereo_pipe: stereo
 * /mpa/voxl_mpa_to_ros_node/stereo_publish: True
 * /mpa/voxl_mpa_to_ros_node/tof_cutoff: 100
 * /mpa/voxl_mpa_to_ros_node/tof_pipe: tof
 * /mpa/voxl_mpa_to_ros_node/tof_publish: True
 * /mpa/voxl_mpa_to_ros_node/vio0_pipe: qvio
 * /mpa/voxl_mpa_to_ros_node/vio0_publish: True
 * /mpa/voxl_mpa_to_ros_node/vio1_pipe:
 * /mpa/voxl_mpa_to_ros_node/vio1_publish: False
 * /rosdistro: indigo
 * /rosversion: 1.11.21

NODES
  /mpa/
    voxl_mpa_to_ros_node (voxl_mpa_to_ros/voxl_mpa_to_ros_node)

ROS_MASTER_URI=http://192.168.1.188:11311/

core service [/rosout] found
process[mpa/voxl_mpa_to_ros_node-1]: started with pid [4257]
Param: "image3_publish" set to false, not publishing associated interface
Param: "image4_publish" set to false, not publishing associated interface
Param: "image5_publish" set to false, not publishing associated interface
Param: "vio1_publish" set to false, not publishing associated interface


MPA to ROS app is now running

Starting Manager Thread with 8 interfaces

Found pipe for interface: tracking, now advertising
Did not find pipe for interface: hires_preview,
    interface will be idle until its pipe appears
Did not find pipe for interface: qvio_overlay,
    interface will be idle until its pipe appears
Found pipe for interface: stereo, now advertising
Found pipe for interface: tof, now advertising
Found pipe for interface: imu0, now advertising
Found pipe for interface: imu1, now advertising
Found pipe for interface: qvio, now advertising
Launch RVIZ on Desktop
On the host computer, run RVIZ
rviz
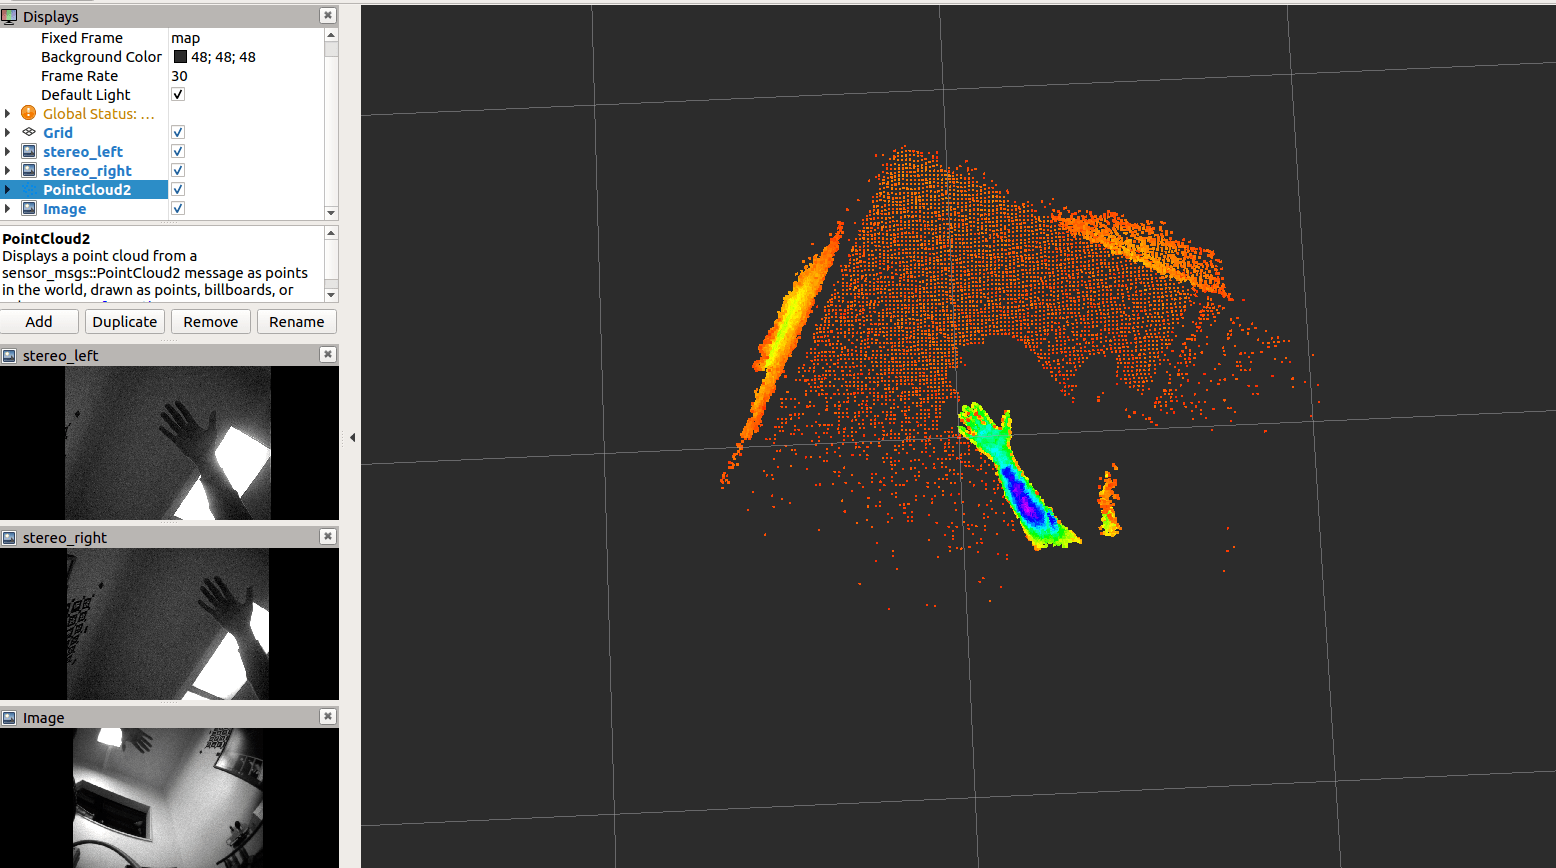
To view the Point Cloud from ToF sensor:
- On the leftmost column click on the “Add” button
- In the pop-up options click on “PointCloud2”
- Change Display Name to “tof”
- In the left column under “tof” tab select type in Image Topic as /tof/point_cloud
- If needed, set the “Global Options” “Fixed Frame” to “map”
- If needed, Under the “tof” node, set Style to “Points”
To View the Tracking image sensors:
- On the leftmost column click on the “Add” button
- In the pop-up options click on “Image”
- Change Display Name to “tracking” and click “OK”
- In the left column, expand the “tracking” node and select type in Image Topic as /tracking/image_raw
To View the Stereo image sensors:
- On the leftmost column click on the “Add” button
- In the pop-up options click on “Image”
- Change Display Name to “stereo_left”
- In the left column under “stereo_left” tab select type in Image Topic as /stereo/left/image_raw
- On the leftmost column click on the “Add” button
- In the pop-up options click on “Image”
- Change Display Name to “stereo_right”
- In the left column under “stereo_right” tab select type in Image Topic as /stereo/right/image_raw
Software Setup (Only need if you mess with things)
Software Setup (only needed if you mess with things)
Out of the box, the VOXL-CAM will already be pre-configured to be able to visualize and publish via ROS. In the situation where the device needs to be configured manually, the steps below demonstrate how to do so.
Setup ADB
On the host computer install the Android debug Bridge (ABD):
me@mylaptop:~$ sudo apt install android-tools-adb android-tools-fastboot
Make sure the VOXL-CAM is connected via Micro-USB to the host PC. If ADB is set up properly you can check ADB detects your device using adb devices. If a device shows up then you have configured it properly.
me@mylaptop:~$ adb devices
List of devices attached
73a05d48	device
Installing Required Packages
The latest VOXL Platform Release is all that is needed, and can be downloaded from here.
This is already installed on units shipped, but if needed, you can follow instructions here to reflash.
Begin by entering the VOXL-CAM’s bash shell from the host computer using adb shell and starting bash.
me@mylaptop:~$ adb shell
/ # bash
yocto:/#
Setup the environment (this assumes VOXL-CAM is in SoftAP with IP Address of 192.168.8.1 which is the default):
Configure Cameras
yocto:~# voxl-configure-cameras
This should allow you to select different camera configurations. After running the command the following prompt will appear, you’ll select option 7.
Which camera configuration are you using?
0 None
1 Tracking + Stereo
2 Tracking Only
3 Hires + Stereo + Tracking (default)
4 Hires + Tracking
5 TOF + Tracking
6 Hires + TOF + Tracking
7 TOF + Stereo + Tracking
8 Hires Only
9 TOF Only
Again, we have camera configuration 7. Enter 7 into the command line and press enter.
Update the environment for ROS usage:
yocto:~# exec bash
yocto:~# source /opt/ros/indigo/setup.bash
yocto:~# source ~/my_ros_env.sh
Enable Core Services
Enable the required services:
yocto:~# systemctl enable voxl-camera-server
yocto:~# systemctl enable voxl-qvio-server
yocto:~# systemctl enable voxl-imu-server
Start the required services:
yocto:~# systemctl start voxl-camera-server
yocto:~# systemctl start voxl-qvio-server
yocto:~# systemctl start voxl-imu-server
Note: You can use voxl-inspect-services from the mpa-tools library to see a list of available services.
You can run any of these servers in an ssh or adb window by typing their executable name, e.g.:
yocto:~# voxl-camera-server
Manually running these will require an open shell window, but will often have the ability to more easily see logged data from the servers.