Unbricking your VOXL 2
Table of contents
Summary
If you have corrupted your VOXL’s filesystem (if ADB is unable to detect your VOXL, this is a common sign), follow this guide.
This process will perform a factory reset. All data on the VOXL will be wiped.
How does it work?
We use Qualcomm’s tool for unbricking Snapdragon devices called QDL.
Snapdragon based devices contain a special mode of operation, called Emergency Download Mode (EDL). In this mode, the device identifies itself as 05c6:901d Qualcomm, Inc. via. USB and can communicate with a PC host.
EDL mode itself implements the Qualcomm Sahara protocol, which accepts an OEM-digitally-signed programmer over USB. The programmer implements the Firehose protocol which allows the host PC to send commands to write into the onboard storage (UFS).
An open source tool (for Linux) that implements the Qualcomm Sahara and Firehose protocols has been developed by Linaro, and can be used to program (or unbrick) Snapdragon based devices.
Usage
Prerequisites
Ubuntu Host (Up to Ubuntu version 20.04)
Some Linux distributions come with ModemManager, a tool for configuring Mobile Broadband. This program, if installed, will interfere with the QDL flashing. One option is to remove the program with the following:
$ sudo apt remove --purge modemmanager
Alternatively, if you need ModemManager, you can temporarily stop it from running with
$ sudo systemctl stop ModemManager
and restart it with:
$ sudo systemctl start ModemManager
GCC is also needed. This can be installed with
$ sudo apt install gcc
OSX Host
Install libusb:
brew install libusb
brew link libusb
Build
Clone the modal-qdl repository using the following:
$ git clone git@gitlab.com:voxl-public/system-image-build/modal-qdl.git
Move into the project directory:
$ cd modal-qdl
Build and install program dependencies using:
$ ./install_dependencies.sh
This will install the qdl program into /usr/local/bin
Test the install by running the following and verifying the output:
$ qdl

qdl [--debug] [--storage <emmc|nand|ufs>] [--finalize-provisioning] [--include <PATH>] <prog.mbn> [<program> <patch> ...]
Image Download
Download the latest image release from the ModalAI protected downloads page
To distinguish between M0054-1 and M0054-2 HW, visit https://docs.modalai.com/m0054-versions/
M0054-1/M0154-1
Latest: VOXL 2 QDL Image 14.1a_1.7.8
Starlin Drones with M0054-2/M0154-2
If above image isn’t working and you have a Starling Drone (D0005), please try M0054-2 Starling QDL Image 1.7.4
Unzip the downloaded release and move it into the following repository path:
$ /modal-qdl/qdl/qfil_app/modalai
To view the web UI, run:
$ ./run.sh
Open browser, go to http://127.0.0.1:8000/
Flash
Hardware preparation
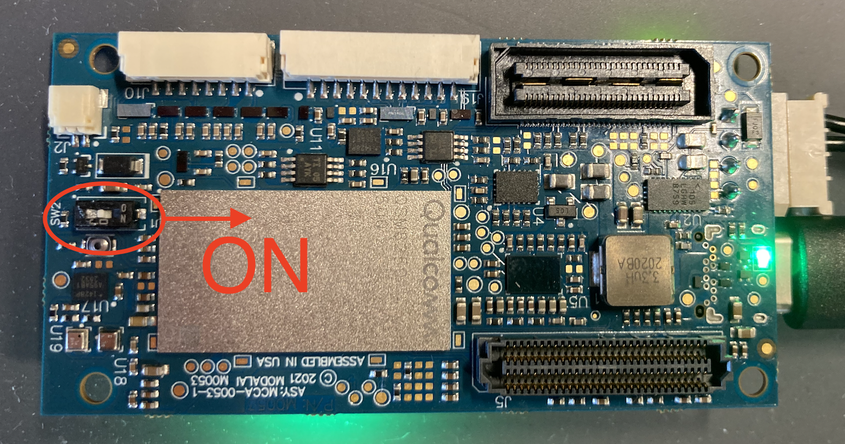
In order to force your VOXL 2 into EDL mode, slide the SW2 switch into the ON position, see below:

Now plug in power and USB-C cable from VOXL 2 to host PC.
Flash Flat Build (Runtime: ~3-5 mins)
Depending on the type of VOXL 2 (M0054-1 or M0054-2), select the corresponding flat build from the dropdown and click Select Build to choose which flat build to use After selecting a build, click Flash Flat Build to begin flashing the flat build
After the flat build has successful flashed, remove power and USB from the device and flip the SW2 switch to OFF to depart from QDL mode
You can now plug in power and, after a short time, USB (first boot after QDL takes slightly longer than following boots) ADB will be available.
Verify that the flash was successful by checking the installed image version:
# adb onto VOXL 2
$ adb shell

# check version
$ root@qrb5165-rb5:/# cat /etc/version
1.1.2-M0054-14.1a-FLAT-V3
This version should match the image you just flashed.
DEBUGGING NOTE: If you are unable to ADB onto the device but the device is being detected correctly by the host PC as seen below:
$ lsusb

Bus 001 Device 022: ID 05c6:901d Qualcomm, Inc. KONA-QRD _SN:21217FEB
restarting the ADB server may fix the issue:
$ adb kill-server

$ adb start-server
You should now be able to ADB onto your device successfully.
Next Steps
Now that your VOXL 2 has been reset to the factory image, you will need to reinstall the SDK (including the System Image and VOXL Suite) to get your VOXL back to it’s original, out-of-the-box state. Without the SDK installed, your VOXL is unable to run the tools, utilities, and services that ModalAI has developed.
To do this, follow this guide.