VOXL 2 - D0015 Architecture (SoloGood Delta Fixed Wing)
Table of contents
VOXL 2 - D0015
Hardware
Summary
The D0015 configuration is used in the base SoloGood Delta Wing reference drone model.
SoloGood Delta Wing- Fixed Wing FamilyM0054- VOXL 2 BoardM0048- Microhard ModemM0065- VOXL 2 IO BoardM0022- PWM Breakout BoardmRo I2C Airspeed Sensor- Airspeed SensorMAX-M10S GPS Module- GPS ModuleLightware SF000- Distance Sensor (via UART)Ghost Atto- RC ControllerM10000011- VOXL Cooling FanAuviPal 90 degree USB C Adapter- 90 degree USB-C Male to USB-C Female adapter
Components
The following core hardware is used for that configuration (note in this list we are excluding the motor, Air Speed Sensor, battery, and transmitter):
| Part Number | Kit Contents |
|---|---|
| MDK-M0054-1–1-C11 | M0054 - VOXL 2 |
| MDK-M0041-1-B-01 | VOXL Power Module v3 and cable |
| MDK-M0065-1-00 | VOXL IO |
| MDK-M0022-1-01 | PWM Breakout Board |
| MDK-M0048-3-01 | VOXL 2 Microhard Addon |
| OEM-M0048-1 | Microhard Modem |
| M10-5883 | GNSS GPS Module & Compass |
| MCBL-00089* | 12-pin JST to ESC, GPS JST + RC 4-pin |
| MCBL-00031 | Passthrough Wires |
- You will need to splice the MCBL-0089 to connect the 5V power from J19 to the air speed sensor.
HW Block Diagram
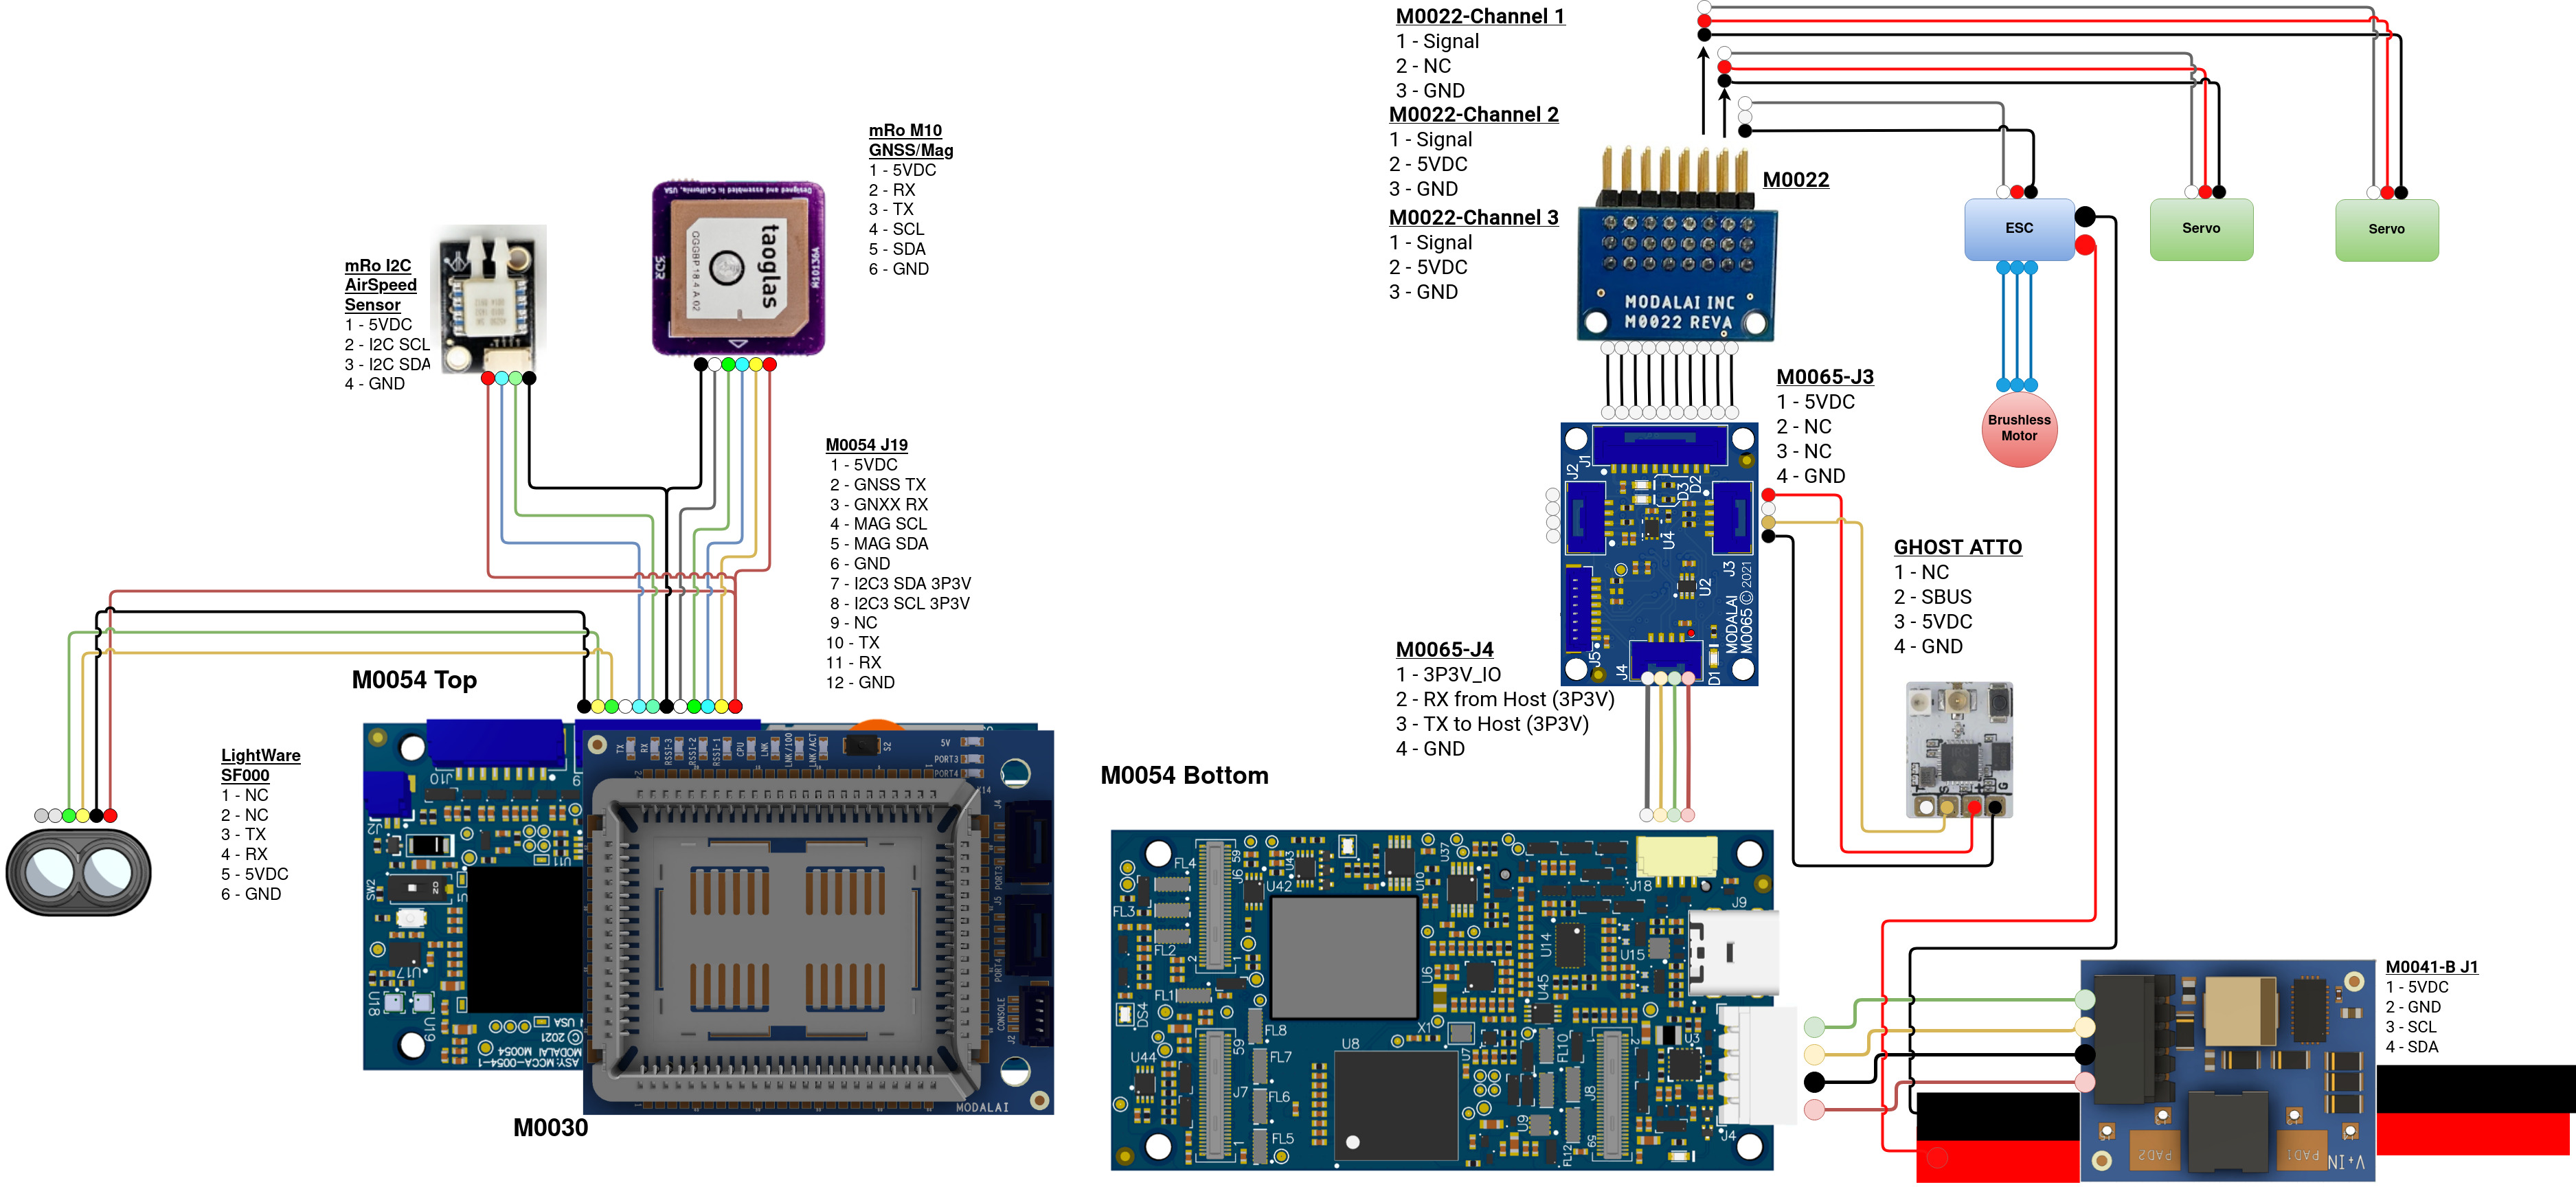
Below describes the compute HW block diagram for the D0015 configuration.
HW Theory of Operation
Power
The VOXL Power Module (MDK-M0041) accepts 2S-6S batteries as input, and passes this straight through to the ESC and also regulates the voltage down to 5VDC.
Output form the power module (M0041-J1), the 5V/6A rated regulator powers VOXL 2 (MDK-M0054) and provides power monitoring information over I2C (to voxl-px4 over DSP, not apps_proc) through the power connector (M0054-J4).
Flight Controller
The VOXL 2 IO Board (MDK-M0065) communicates over UART to voxl-px4 between M0065-J4 and M0054-J18.
The RC is Ghost Atto, which can use GHST protocol or SBUS protocol. The Atto is connected to the VOXL 2 IO Board (MDK-M0065) on port J3. Setting Ghost to SBUS will be covered in the SW Setup section below.
The VOXL 2 GPS/Mag/Airspeed bind assembly is a possible solution for GPS (UART) Mag (I2C), and Air Speed Sensor (I2C). Both communicate to voxl-px4 over a UART and two I2C ports (exposed from DSP, not apps_proc) This kit uses Ublox MAX-M10S and I2C Airspeed Sensor form mRo.
Optionally: A LightWare SF000 can be attached using UART, this will require modifying the fixed wing’s frame to allow for the Lidar to see out. If the lidar is being used, a connection to the VOXL 2 (M0054-J19) can be made.
SW Setup - SDK 1.1.3-1 or later
VOXL Software
voxl-modem
Documentation on configuring the RC can be found here.
Documentation on the Hardware setup for the Microhard setup can be found here.
Communication between the fixed wing and ground station should be done through the Microhard Modem Hat. Which needs to be configured on the VOXL 2 using the command voxl-configure-modem.
VOXL 2:/$ voxl-configure-modem
Starting interactive mode

What type of modem are you using?

1) v2	      3) dtc	    5) quectel
2) microhard  4) doodle	    6) em9191
#? 2

Enter the IP address you would like to the VOXL to use on the Microhard network:
Note: The chosen IP address must be of the form: 192.168.168.XXX

Default - 192.168.168.100

1) default
2) custom
#? 1
This will set the IP of the VOXL 2 to the default IP which is 192.168.168.100.
voxl-px4
Using the VOXL 2 IO board is necessary to control the ESC and the Servo Motors for the fixed wing. This requires voxl-px4 to be configured differently then ModalAI drones like the Starling, Sentinel, etc. Documentation on how to setup the VOXL 2 IO board can be found here.
PX4 Software
px4-Parameters
At the time of writing this, voxl-px4 does’t have a pre-configure command for fixed-wings. so we will have to change some of the specific parameters on voxl-px4 through QGC.
At this point, it is assumed that the drone is connected accessible from QGC. If you are not using a lidar then you can skip steps 5 & 6.
- Open QGC and connect to the Drone.
- Go into the Airframe Tab.
- Select the Flying Wing option.
- Click the drop-down arrow and select
Generic Flying Wing - Go in to Parameters Tab.
- Using the Search Bar, search and change the following parameters:
SENS_EN_SF0XtoLW20/c
ESC/ Servos Setup
- Open QGC and connect to the drone.
- Go into the Actuator Tab.
- Under Actuator Outputs, select VOXL 2 IO Output
- Assign the PWM channels to the respective motors.
ArduPlane Software
Check out the demo flight here!
Refer here for installing ArduPlane on the VOXL
ArduPlane Parameters
Servos Setup
- Open QGC or Mission Planner and connect to the drone
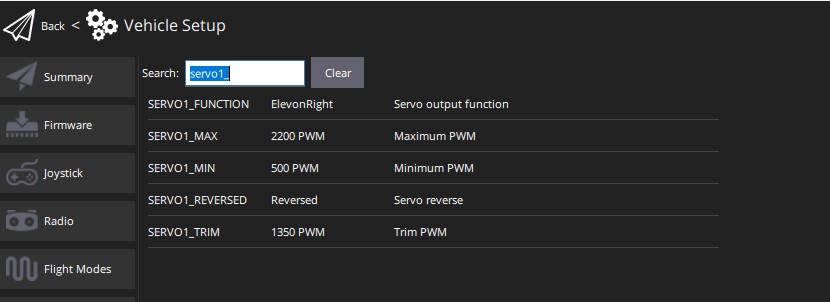
- For the corresponding pin # set the SERVO[PIN#]_FUNCTION to ElevonLeft or ElevonRight corresponding with which servo is connected to which side
- For the most range set the SERVO[PIN #]_MIN to 500, SERVO[PIN#]_MAX to 2200, and SERVO[PIN#]_TRIM to 1350
- Make sure to adjust the flaps by hand so that they’re centered
ESC Calibration
- Power on the VOXL but have your ESC unpowered
- Open QGC or Mission Planner and connect to the drone
- Follow the official documentation for calibrating the ESC here
Download the parameters from our setup here: D0015_ardplane_params
Note: If the ESC is beeping at boot indicating the PWM signal coming from the VOXL is below the ESC’s minimum PWM range you can tune the SERVO[PIN #]_TRIM and SERVO[PIN #]_MIN to be above that
Calibrations
AirSpeed Sensor
- Open QGC and connect to the Drone
- Go into the Sensors Tab
- Select the Airspeed option.
- Follow the instructions on the screen.
- Avoid the Airspeed Sensor getting any wind until prompted to.
- when prompted blow into the airspeed sensor to create wind readings.
GPS/Mag
- Open QGC and connect to the Drone
- Go into the Sensors Tab
- Select the Compass option.
- Follow the instructions on the screen yawing the drone in each of the orientations.
HW Attachments
3D Prints
Microhard Case & Cooling Fan Opening
FPV Camera
- Download and print the top nose cone and bottom nose cone for the delta wing nose cone.
- Connect the Interposer onto the bottom of the VOXL2 to port J7.
- Place the IMX412 into the center opening of the nose cone’s bottom.
- Connect the MIPI extender to the back of the IMX412.
- Remove the Styrofoam piece for the FPV port on the Delta Wing
- Route the MIPI cable through the FPV port.
- Place the airspeed sensor’s Pitot tube into the groves on the nose cone.
- Place the nose cone top onto the top of the nose cone bottom.
- To secure it down the top of the nose cone to the bottom you can use hot glue along the sides or tape them together.
- Finally attach the nose cone to the front of the Delta wing, using VBS tape or Duct Tape.
Other Services
Below are links and summaries of the other services that are expected to be running by default:
| Service | Summary | Interface |
|---|---|---|
| voxl-mavlink-server | provides an MPA interface to perform MAVLink communication to/from a PX4 flight controller over UART or UDP | IP/UART/MPA |
| voxl-modem | Acts as the main hub managing communication between VOXL MPA services and autopilots such as PX4 and Ardupilot | IP/MPA |
| voxl-portal | embedded web server with ever expanding feature set | MPA/HTTP/REST |
| voxl-px4 | QVIO processing server | MPA |
| voxl-wait-for-fs | Helper service to flush files to disk on cycle | NA |

