
This component is EOL, please see its replacement M0151
USB Expander and Debug Add-On Board User Guide
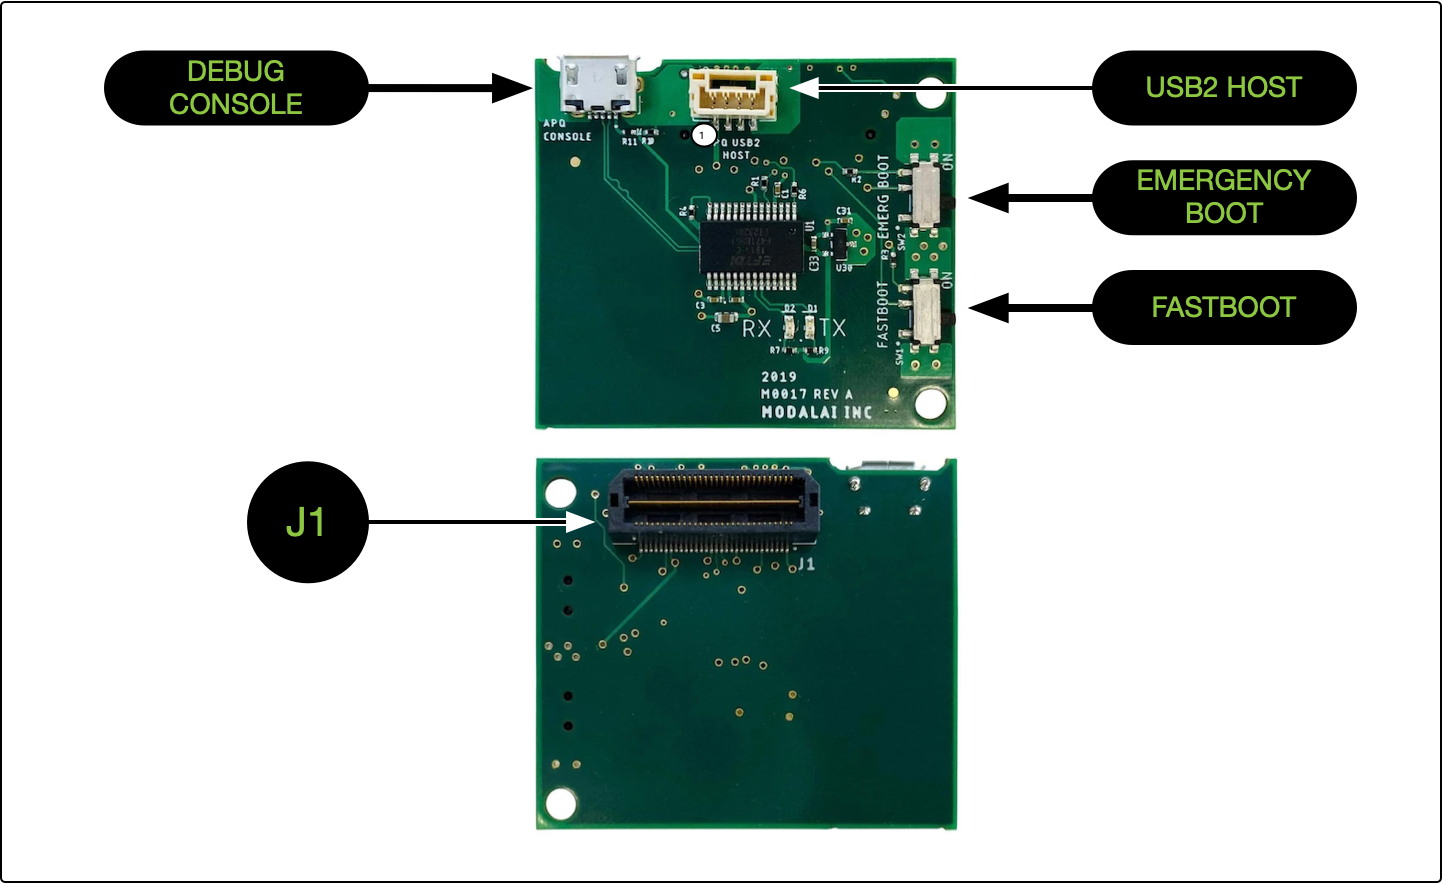
VOXL USB Expander and Debug Add-On board adds an additional USB2 connector and allows VOXL to be put into fastboot or emergency boot modes.
Table of contents
- Summary
- Board Connections
- Specification
- USB2 Host Pinout
- Connecting to VOXL
- Connecting a USB2 Peripheral
- Forcing the VOXL into Fastboot to Unbrick
- Using the Debug Console
- Forcing the VOXL into Emergency Boot
Summary
The VOXL USB Expander and Debug Add-On board provides:
- Ability to connect an additional USB2 peripheral device to VOXL
- A debug console for low level system debugging
- A switch that will force VOXL to boot into
fastbootmode (for reflashing the System Image if the unit is bricked in the field) - A switch that will force VOXL to boot into
emergency bootmode (used at the factory only)- NOTE: newer versions of the board don’t have this switch populated
Board Connections
Specification
| Specicifcation | Value |
|---|---|
| Weight | 5g |
| Debug Console Connector | Micro USB, Female |
| Debug Console Mating Connector | Micro USB, Male |
| USB2 Host Connector | 4 Position JST GH, Vertical, BM04B-GHS-TBT |
| USB2 Host Mating Connector | JST GHR-04V-S |
| J1 Connector | Samtec Inc, MPN: QTH-030-01-F-D-K |
| J1 Mating Connector | Samtec Inc., MPN: QSH-030-01-L-D-A-K |
USB2 Host Pinout
Pin 1 is marked in the Board Connections graphic above.
| Pin | Value |
|---|---|
| 1 | VBUS |
| 2 | USB_M |
| 3 | USB_P |
| 4 | GND |
Connecting to VOXL
To connect the USB Expander and Debug Add-On board to VOXL:
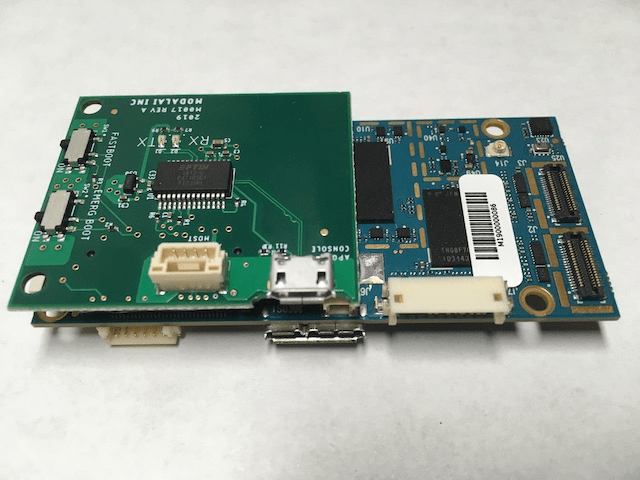
- Attach the daughter board’s
J1connector to VOXL’sJ13connector
Connecting a USB2 Peripheral
A USB2 peripheral can be connected via a JST GHR-04V-S connector following the pinouts specified in the datasheet.
To validate the connection:
- Power off the VOXL
- Attach the USB Expander and Debug Add-On board
- Ensure the
FASTBOOTlabeled switch is set to off - Ensure the
EMERG BOOTlabeled switch is set to off- NOTE: if your board is missing the
EMERG BOOTswitch, this is OK as its default un-populated state is OFF
- NOTE: if your board is missing the
- Attach the USB2 peripheral
- Power on the VOXL
- Connect a Micro USB cable to VOXL’s USB port and connect to a Linux PC
Open the terminal in the Linux PC and run the following:
adb shell
Now you’re inside VOXL, run the following, where in this use case we’ve attached a Flight Core board to the USB2 Host connector (showing up as the STMicroelectronics MCU):
/ # lsusb
...
Bus 001 Device 003: ID 0483:a32f STMicroelectronics
...
Forcing the VOXL into Fastboot to Unbrick
Follow the unbrick procedure found at docs.modalai.com/unbrick-voxl
Using the Debug Console
You’ll need two MicroUSB cables for this procedure.
- Power off the VOXL
- Attach the USB Expander and Debug Add-On board
- Ensure the
FASTBOOTlabeled switch is set to off - Ensure the
EMERG BOOTlabeled switch is set to off - Connect a Micro USB cable to VOXL’s USB port and connect to a Linux PC
- Connect a second Micro USB cable to the Add-On board’s Micro USB port and connect to a Linux PC. It may display as
FT232R USB UARTand will exist as/dev/ttyUSB0 - Power on the VOXL
Open Terminal A in the Linux PC and run the following command (if screen isn’t installed, first run apt install screen):
screen /dev/ttyUSB0 115200
[HIT ENTER]
Open Terminal B in the Linux PC and run the following commands:
adb shell
reboot
You should now see debug information in Terminal A:
[10] Opening SSR Glink Port success
[20] Glink Connection between APPS and RPM established
[20] Glink Connection between APPS and RPM established
[40] UFS init success
[80] pm8x41_get_is_cold_boot: cold boot
[90] Unable to locate /bootselect partition
[90] Loading (boot) image (57376768): start
[300] Loading (boot) image (57376768): done
[310] use_signed_kernel=1, is_unlocked=1, is_tampered=0.
[310] decompressing kernel image: start
[630] decompressing kernel image: done
[640] Best match DTB tags 291/00000008/0x00000003/30001/20009/10013/0/0/940319e2/51297
[650] Using pmic info 0x20009/0x10013/0x0/0x0 for device 0x20009/0x10113/0x0/0x0
[650] cmdline: noinitrd rw console=ttyHSL0,115200,n8 androidboot.hardware=qcom ehci-hcd.park=3 msm_rtb.filter=0x37 lpm_levels.sleep_disabled=0 rootwait net.ifnames=0 androidboot.bootdevice=624000.ufshc androidboot.serialno=a0259b4a androidboot.baseband=apq root[670] Updating device tree: start
[680] Updating device tree: done
[680] RPM GLINK UnInit
[690] booting linux @ 0x80080000, ramdisk @ 0x82200000 (0), tags/device tree @ 0x82000000
[690] Jumping to kernel via monitor
Forcing the VOXL into Emergency Boot
This is typically done at the factory and not in the field by a normal user. To force the VOXL to boot into emergency boot mode:
- Power off the VOXL
- Attach the USB Expander and Debug Add-On board
- Ensure the
FASTBOOTlabeled switch is set to off - Ensure the
EMERG BOOTlabeled switch is set to on - Attach
- Power on the VOXL
The device will show up on a Linux PC as Qualcomm, Inc. Gobi Wireless Modem:
/ lsusb
...
Bus 001 Device 015: ID 05c6:9008 Qualcomm, Inc. Gobi Wireless Modem (QDL mode)
...