glass-to-glass means camera-to-screen, which represents the total end-to-end latency
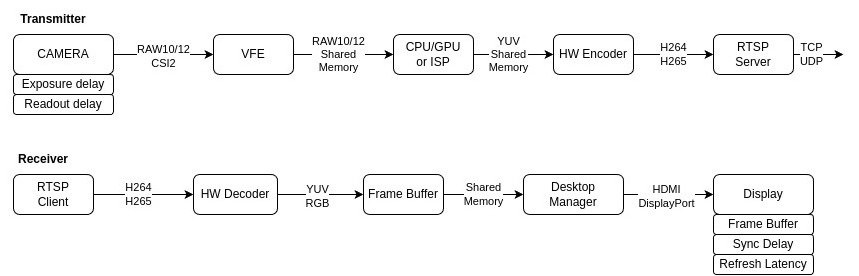
Typical Data Flow
Sources of Latency on the Transmitter Side (VOXL2)
frame acquisition
frame exposure time (controlled by Auto Exposure algorithm or manual exposure)
frame readout time (fixed for a given camera streaming mode, depends on camera, frame size and configured transmission speed)
frame exposure and readout (in a rolling shutter camera) happen concurrently in a rolling pattern
image processing (RAW to RGB / YUV conversion + all other image processing)
Using Qualcomm ISP, or
Using ModalAI processing pipeline (MISP)
video encoding, typically hardware encoder (H264 or H265)
either directly using voxl-camera-server
or using voxl-streamer to encode uncompressed frames
video packaging
for example, RTSP stream, using voxl-streamer
wifi transmission
latency depends on encoded frame size and communication link speed
unreliable link will result in data loss and re-transmission, resulting in extra delay
UDP protocol may be used to remove re-transmission latency, but corrupted frames will be lost
Sources of Latency on the Receiver Side
reception of data via Wifi (the same latency as the transmission time on the transmitter, do not double count)
parsing of encoded packets and decoding the H264 / H265 stream into full image (using either SW or HW decoder)
buffering in order to ensure smooth playback (this is not good for latency!)
composition / rendering of the screens (if using a Desktop Manager)
transmission of the display buffer to the display (HDMI, DisplayPort, etc)
buffering on the display side, since the display is typically not frame-synchronized with the Receiver
How to Measure Camera Pipeline Latency
use voxl-inspect-cam to inspect the _encoded stream
latency figure is the total latency after the frame starts transmitting into VOXL2 (after exposure of the first line for rolling shutter cameras) until the encoded frame is ready
this does not include the frame exposure time
in order to calculate total TX latency of the center of the image, as an approximation, add 1/2 of the frame exposure time
frame timestamp (from voxl-camera-server) is the start of exposure of the first row of the image
running VOXL in Performance Mode (voxl-set-cpu-mode perf should reduce the TX latency slightly)
Optimizing Latency on the Transmitter Side
use latest camera drivers that reduce the readout time
for IMX412 Camera : https://storage.googleapis.com/modalai_public/temp/imx412_test_bins/20250409/imx412_fps_eis_20250409_drivers.zip
do not configure high-resolution streams if they are not used
this will allow selecting a lower resolution camera mode, reduce readout time
set VOXL2 to performance mode : voxl-set-cpu-mode perf
if possible, remove any buffering on the video server side (RTSP, etc)
Optimizing Latency on the Receiver Side
A custom decoding / rendering pipeline may be required to achieve lowest latency
Use hardware-based decoder if available
Reduce buffering delay, typically added by decoder / player for smooth playback
the Display FPS will affect the total stream latency (higher FPS will result in lower latency)
Use a display that supports 120 or 240 FPS and configure your OS to run the display at highest refresh rate
running the display at highest possible rate will reduce the buffering time in OS and the display itself
there will still be extra frames of delay due to buffering, but the frame duration will be shorter at higher FPS
Desktop manager will add 1-2 frame latency in order to compose and render the whole “desktop” before sending to the display
if possible, reduce the delay of the desktop manager (e.g. enter full screen mode)
Camera Pipeline Latency in Different Operating Modes
IMX412 Camera with latest drivers
does not include encoded frame packaging / transmission
latency measured voxl-inspect-cam tool and may include small additional overhead
voxl-inspect-cam tool subscribes to the camera stream and reports the time between start of frame readout and receiving the (encoded) frame
❗note that increasing source resolution will typically improve the down-scaled image quality, so if the additional delay is not critical, using higher input resolution may be desired
Operating Mode (IN -> OUT)
Readout (ms)
Processing MISP / ISP (ms)
Encoding (ms)
Total Latency MISP / ISP (ms)
3840x2160 -> 3840x2160
12
6-10 / 10-15
14-15
34-38 / 40-42
3840x2160 -> 1920x1080
12
4-6 / 6-8
7-8
26-28 / 28-30
3840x2160 -> 1280x720
12
3-4 / 4-6
4-5
23-24 / 26-27
1920x1080 -> 1920x1080
4
2-3 / 3-4
4-5
15-17 / 18-20
1920x1080 -> 1280x720
4
1-2 / 2-3
4-5
11-13 / 14-16
Voxl Camera Server Configuration
How to Check Which RAW Resolutions are Available
in this example we are using IMX412 drivers dated 20250311
voxl-camera-server -l
...
ANDROID_SCALER_AVAILABLE_RAW_SIZES:
These are likely supported by the sensor
4056 x 3040
4040 x 3040
4040 x 3040
3840 x 2160
3840 x 2160
3840 x 2160
1996 x 1520
1996 x 1520
1996 x 1520
1936 x 1080
1936 x 1080
..
multiple entries for each resolution are shown because there are different FPS for each resolution, but FPS are not shown
you should only request the resolution that is available and check the following table for available FPS:
IMX412 Operating Modes
using camera drivers from 20250409 (see link above)
** the camera in 4040x3040@60 mode is slightly overclocked from 2.1Gbps / lane to 2.2Gbps MIPI bit rate (voxl2 supports up to 2.5Gbps) in order to allow sufficient time between EOF and SOF.
   - 4056x3040 @ 30                     16.5ms readout time
   - 4040x3040 @ 30, **60**             16.5ms readout time
   - 3840x2160 @ 30, 60, 80             11.8ms readout time
   - 1996x1520 @ 30, 60, 120            5.5ms readout time
   - 1936x1080 @ 30, 60, 90, 120, 240   4.0ms readout time
   - 1996x480  @ 30, 480                1.8ms readout time *** experimental ***
   - 1996x240  @ 30, 800                0.9 - 1.0 ms readout time *** not always stable at 800 FPS ***
Voxl-camera-server.conf When Using Qualcomm ISP
using latest camera drivers with Qualcomm ISP option is not a must
however, it is still important to track the input resolution vs output
input resolution (preview_width) may need to be adjusted to 1920, depending on the camera driver used
using older drivers will result in slightly slower readout times (about 25% slower, which is not critical)
enabling en_raw_preview will enforce the specific camera mode, even if the preview stream is not actually consumed at run time
en_preview and en_raw_preview may be disabled if you want to just let the camera pipeline pick the best quality mode for the small_encoded video
How to Confirm Which Camera Resolution Was Selected by the Pipeline
double check in /vendor/etc/camera/camxoverridesettings.txt
maxRAWSizes=20 : this is needed to allow camera pipeline to use all available RAW resolutions
systemLogEnable=1 : this is needed to see the selected resolution in the debug message. System log can be disabled after testing, will slightly reduce cpu usage. this is logging from camera pipeline that goes to logcat
run logcat | grep -i selected in one terminal on VOXL2
start voxl-camera-server in another terminal on VOXL2
pay attention to the resolution listed as Selected Sensor Mode
Suggested Use Case for FPV Wifi Streaming
IMX412 Camera is recommended for best low latency performance
output resolution 1280x720, down-scaled during processing
binned camera resolution, such as 1920x1080. Use 1936x1080 for compatibility with MISP (1936x1080 input, 1280x720 output)
h265 encoder, CBR at 0.5 - 1.5 Mbps; number of P frames: 29 or 59 (or choose lower if less dropout is needed in case of frame drop)
use 60FPS camera frame rate
ideally, use UDP-based transmission protocol (not discussed here)
for even lower latency, a lower resolution may be used, such as 960x540
How To Test End-to-end Latency
In order to eliminate measurement variability due to exposure length, use manual exposure and set to a small value (1-2ms)
An approximate measurement can be done by pointing the camera at a millisecond timer (using a phone or laptop screen) and taking a picture of the timer and rendered screen of the streamed video (side by side)
the difference in the time is the total latency
note that refresh rate of phone displays can be variable
Ideal test would involve a hardware timer that updates at a very fast rate, such as 1ms (instead of a timer that is rendered on a screen)
A delay in number of frames can be measured by embedding a frame count or a timestamp directly into the transmitted image
this measurement will have a granularity of one frame
How to enable frame number watermark (works only with ISP pipeline)
#add the following to /vendor/etc/camera/camxoverridesettings.txt and restart voxl-camera-server
watermarkImage=TRUE
watermarkOffset=20x20
forceDisableUBWCOnIfeIpeLink=TRUE
Example of Image With Frame Counter Watermark
Example of Streaming Delay Shown Using the Counter Watermark
using voxl-portal to display the YUV stream, which is transmitted encoded as MJPEG
in this example, the delay between 5-7 frames (probably 6 on average), at 60FPS, 6 * 16.666 = 100ms
note that MJPEG encoding is slower than H264 / H265 and Display used is running at 60Hz
however, in this case we are bypassing any buffering done by rtsp server and client because voxl-portal renders MJPEG instantly
Display Low Latency H264 or H265 Stream Using a Ubuntu Desktop or Laptop